Sims 4 Port Guide by Quoth (quotharaven#2948)
Hello everyone! Here is a guide on how to port something from the Sims 4 to FFXIV.
Things you will need
Programs
- Sims 4 Studio -> Find it here
- Blender/3DS Max -> Find Blender here; or on Steam!
- Photoshop/Gimp (or another photo edit program where you can edit channels of an image) -> Find Gimp here ; or you can use Photopea
- Textools -> Find it here
Not necessary to have but helps if you are doing more editing:
- Substance Painter -> Paid Program Link Here
- I will not be showing how to use this program in this guide, as there are many resources specifically for this program!
Other Files
- Titan’s Hand Painted Normal File -> NECESSARY
- FFXIV Textools Reference Guide -> helpful for bones & coloursets!
- XIV Guides Resource -> If you are completely lost this has a bunch of tutorials!
Step One (Find a Mesh)
Go find a sims mesh you wish to port. It’s good practice and kind to get the creator’s permission, but I’m not your mother so I can’t tell you what to do.
TO NOTE: CC stands for Custom Content. You will likely see it a lot when searching!
Sites for sims:
- The Sims Resource
- Tumblr (Search for sims4cc)
- ModTheSims
- CurseForge
When you download a piece of CC, it will come in a .package file (or a zip file that you will need to extract using your preferred zip extractor like 7Zip or WinRar).
For this guide I will be using a mesh by Simpliciaty, as they have agreed to let me port their meshes. I am using the Naomi Matching Set.
Step Two (Sims4Studio)
Open the Sims4Studio. You will get a popup like this. YOU DO NOT NEED A SIMS GAME INSTALLED FOR THIS.
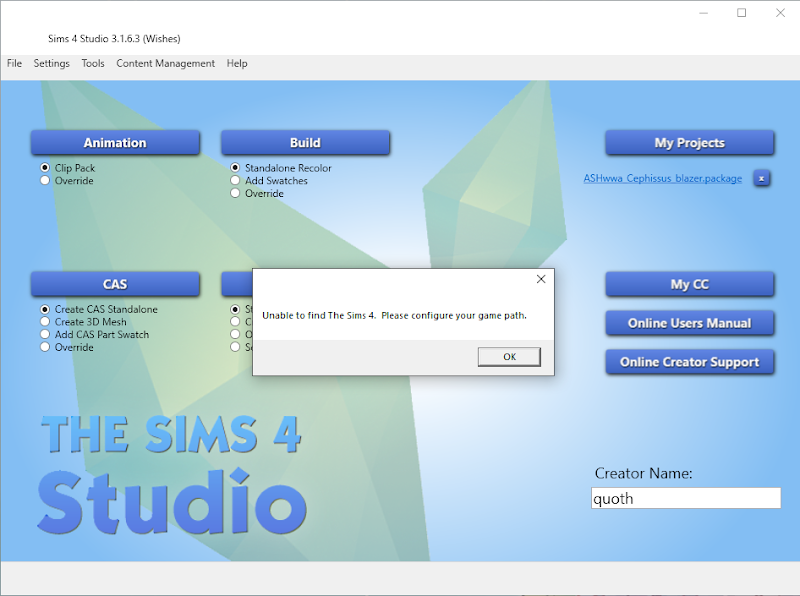
Press okay. You will get a second popup like the one below, exit out of that one too.
Welcome to the Studio! Now we can begin.
-
Click on ‘My Projects’ and upload the .package file you found before.
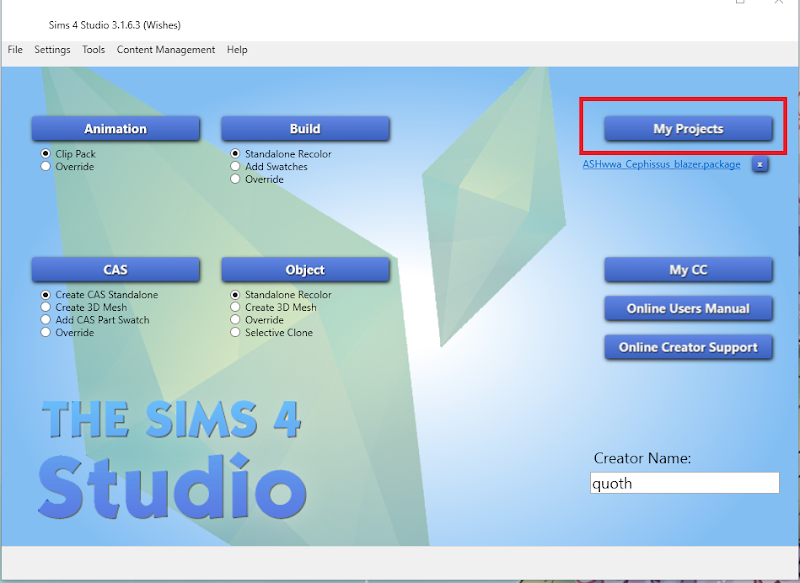
You will have to find through the file explorer that pops up where you put your .package file, select it, and double click it or select it and hit the ‘Open’ button
-
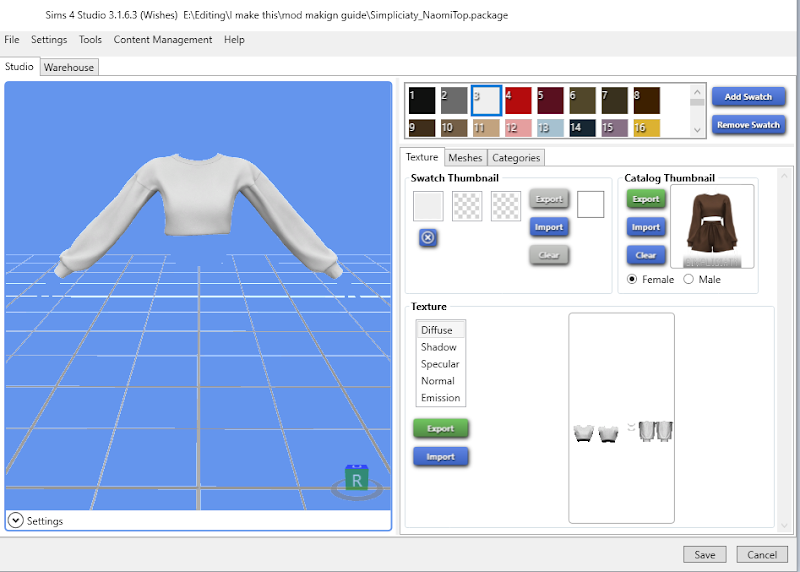
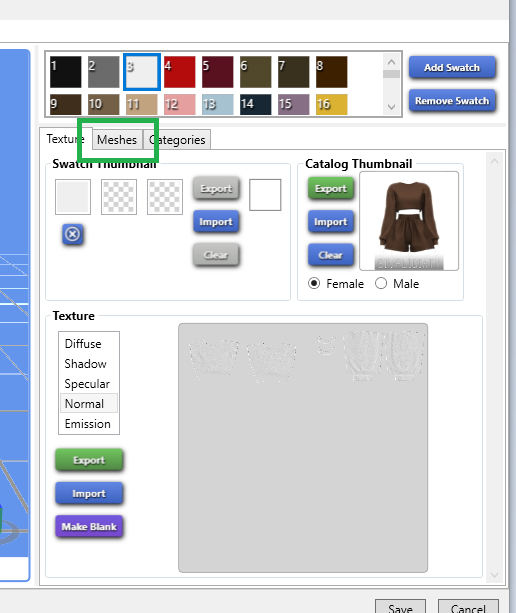
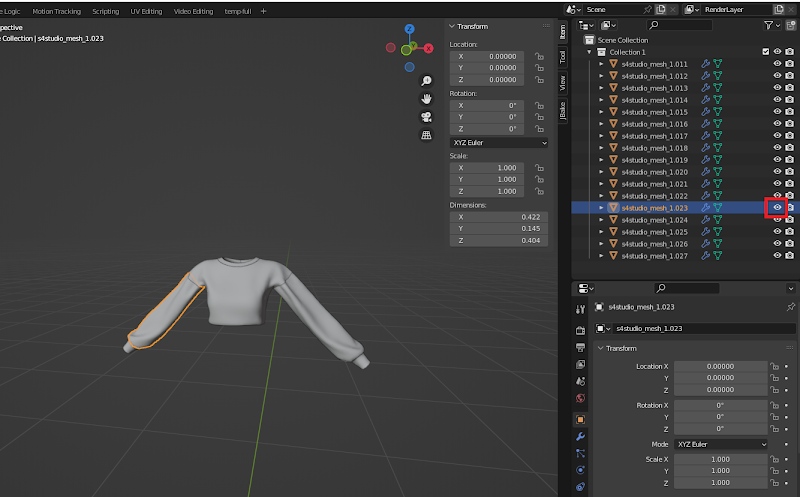
Sims4Studio Layout
A new window will pop up when you have selected your .package file and hit ‘Open’, that will look something like this
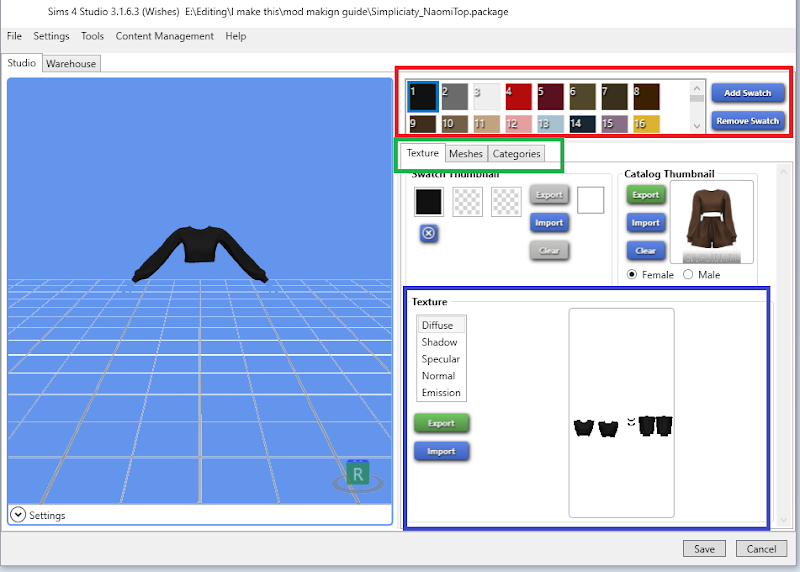
To help you find things, here is a colour-coded version:
- RED: This is the swatch window.
- GREEN: These are your window selections.
- BLUE: This is your texture window.
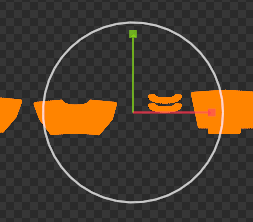
The blue section with the grid is the model viewer. If you want to turn around the model to look at the pattern, you RIGHT CLICK and HOLD on the section with the blue grid, then drag your mouse around. That will turn the model. You can also use the gizmo in the lower righthand corner.
-
Getting Your Textures
In your texture window (the BLUE square above), you have a number of options. We will go through the ones we need individually.
-
Diffuse
You should be defaulted to the ‘diffuse’ tab. Right now, my diffuse is black, as you can see. For now, we are going to grab the diffuse. I try to get the diffuse that is as close to white as possible, for ease later.
To do this, go to the swatches window (the RED square above), and click/scroll through the swatches until we find one that is white (or the closest we have- you may not have a white one and that is okay!)
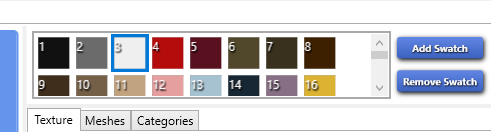
For me, swatch #3 was white, so I clicked that one. It will become highlighted in blue, like the picture, and the model in the viewer and the texture will change accordingly, like so:
Now that we have our white diffuse (or whatever diffuse you decide), we are going to hit the green ‘export’ button (I have outlined it in ORANGE below):
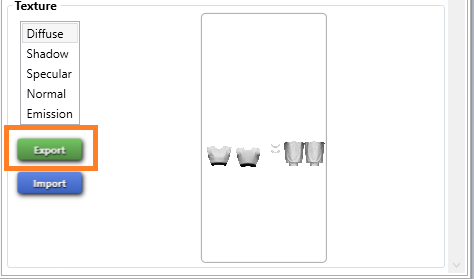
This will pop up a window to save the texture. I would name it something like ‘diffuse’ to keep track of, and save it somewhere you will be able to find! I usually make a folder to keep everything together
-
Normal
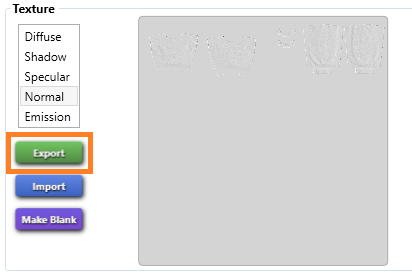
Next we are going to select ‘Normal’ from the texture list, and hit the export button again. Ignore the purple button that comes up, we don’t need it.
Save it somewhere you can find it, and I would name it something like ‘normal’ to keep track of!
-
Mesh
We are now going to use the window selection (GREEN square from the original image above) and move to the ‘Meshes’ category.
We now have a window like this (orange square added). Make sure the Level of Detail (LOD) is at LOD 0 (zero!), then click ‘export mesh’ (the orange square). Save it somewhere you will find, and name it something like ‘mesh’ to keep track of!.
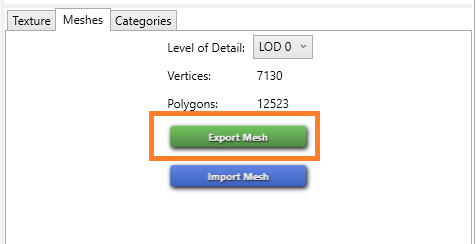
TO NOTE: it will save it as a Blender file. It may ask you to download an older version of Blender to do this, this is NORMAL. Do not panic! If you have Blender through Steam, you can select a version. If not, just google the version number that the pop up asks for and download it, following its install directions. Don’t delete your current version of Blender! The two will work at the same time.
-
Extra Diffuses
If you want any extra diffuses (perhaps there are different patterns you want!), navigate back to the ‘Texture’ window and follow the steps from the ‘Diffuse’ step (step one!).
We are now all done with S4S! You can close out of it.
Step Three (Blender)
We now move to the 3D editing section. I will be showing the process in Blender, although it can be done in other 3D programs!
Sims4 Mesh
Open up the mesh that you saved. It will be in an older version of blender, that’s okay!
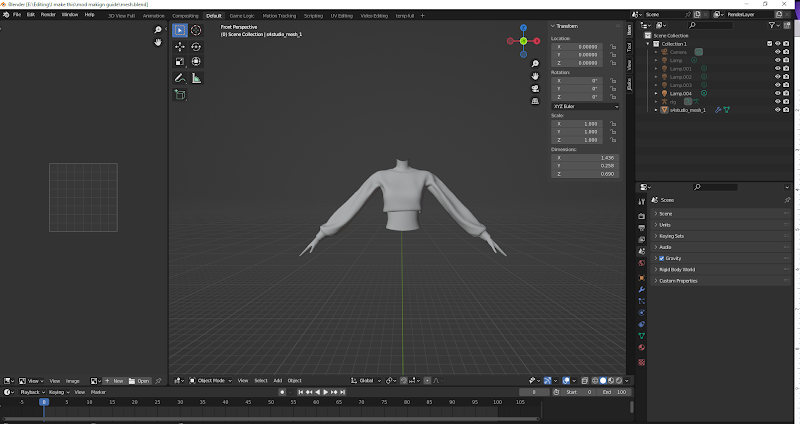
This is what the screen looks like for me in this version of blender. We can ignore half of it because there are only a couple things we need to do here to prep the mesh.
How do I move the Camera?
To move in blender, you can use the SCROLL WHEEL on your mouse to zoom in and out. Clicking IN the scroll wheel and HOLDING allows you to rotate the camera. Hold down the SHIFT KEY, then clicking in your scroll wheel and HOLDING allows you to pan the camera.
Delete the Extras
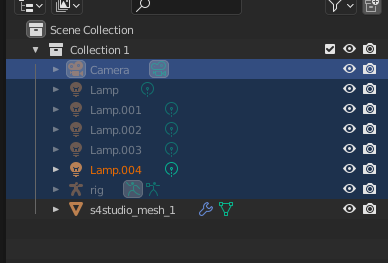
To prep the mesh, we need to get it ready for export by deleting all the junk it came with. In the right side of your screen in scene selection, we have a bunch of lamps and rigs and what have you, like this:
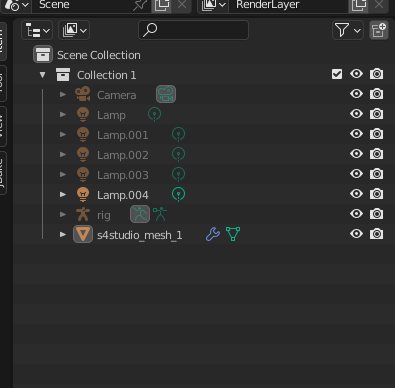
The only part we need is the part that has the triangle next to it, called ‘s4studio_mesh’. DO NOT DELETE THIS. If there is more than one, keep all that have that triangle!
Click the first item on the list (in this case, ‘Camera’), then hold down the SHIFT key and click the last unnecessary item on the list (in this case ‘rig’). This will select all of them, like this:
Now you can press the delete button! It will get rid of the extras and leave you with only the mesh (the triangle with ‘s4studio’). It should look something like this:

Prepping the Mesh
Now you’ll want to click on the mesh itself in the viewfinder. It should show up with an orange outline, like this:

Once you have that orange outline, hit TAB on your keyboard. This will take you into edit mode, where you can see all the vertices.
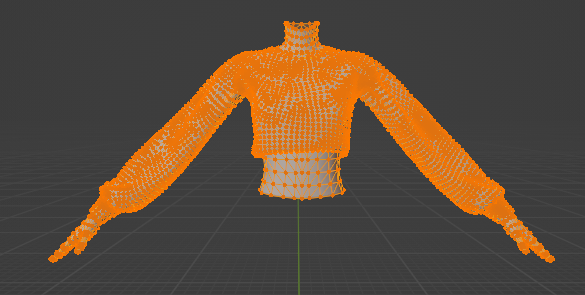
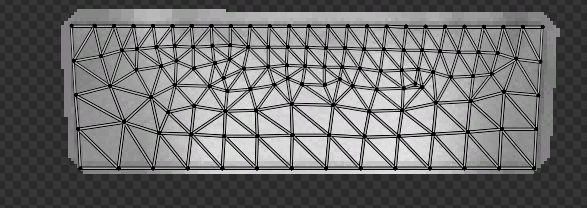
It will look something like this!
PROBLEM: My mesh isn’t lit up orange!
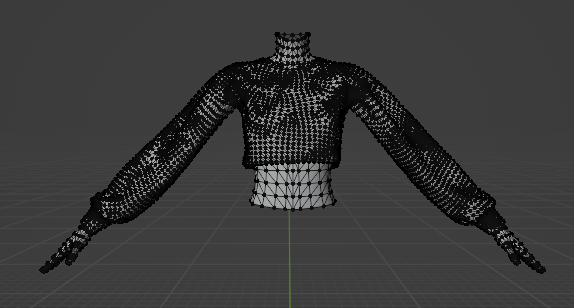
That’s okay! Click in the viewfinder or on the mesh, and press the ‘A’ key on your keyboard. This will select all of the vertices and make it glow orange.
Separating the Mesh
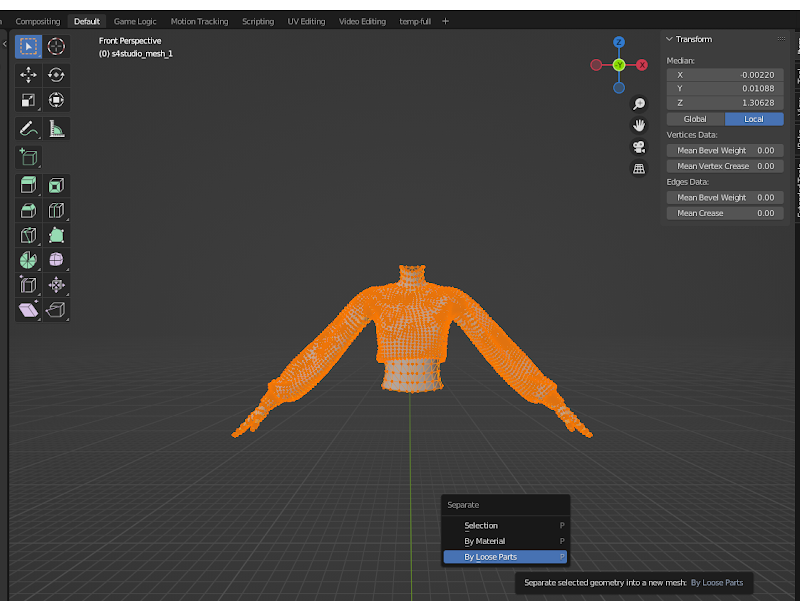
Now that you have your mesh lit up in orange, press the ‘P’ button on your keyboard, which will bring up the ‘Separate’ menu, like this:
You want to select ‘By Loose Parts’, which will break the mesh into chunks.
OR (DO NOT DO BOTH)
When your mesh is lit up orange, right click on your mesh to bring up the menu, and go to the ‘Separate’ menu to click ‘By Loose Parts’, which will break the mesh into chunks.
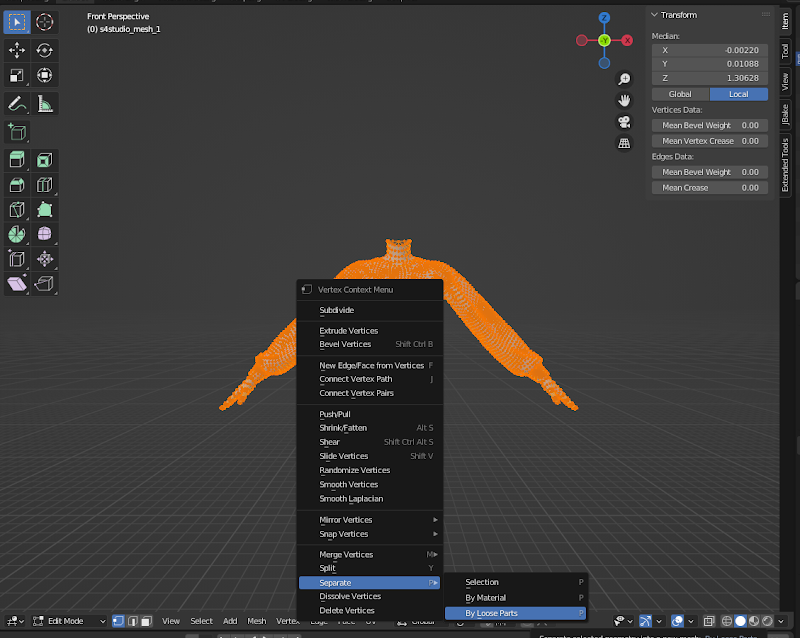
You will get the same end result!
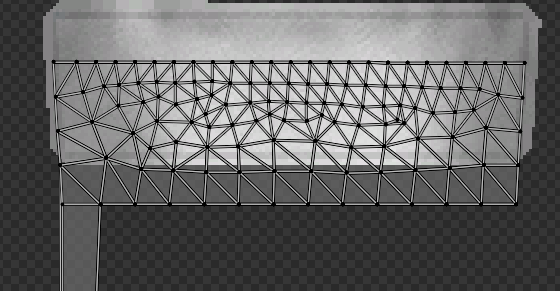
The result of either operation will look something like this:
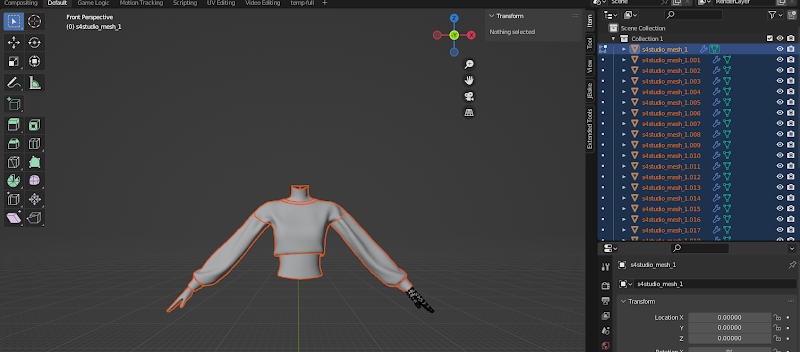
Press TAB to enter back into object mode (you shouldn’t see any of the orange or black dots/vertices in object mode). It will look like this:
Click somewhere in the viewfinder to deselect everything. There should be NO orange outlines!
Deleting Skin Mesh
Now that we have our mesh separated into all those lovely chunks, it is time to take away the skin mesh. FF uses its own skin meshes, so we do not want to keep any Sims skin in our mesh.
To do this, we look at our clothing and click on the pieces that look like skin (aka the hands, the neck, the stomach, etc). Depending on what your mesh is, you may/may not have skin sections. That is okay! We will go over the process. If you do not have any skin mesh to be deleted, skip to the next section (DELETING UNWANTED PIECES).
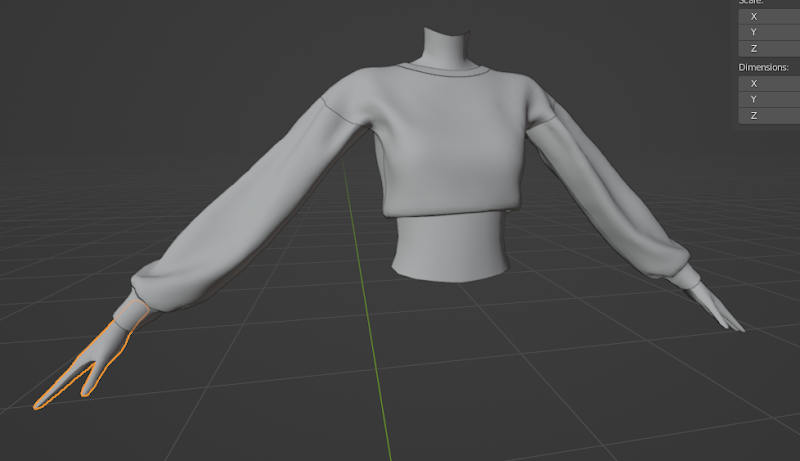
In my case, I have quite a bit of skin in my mesh that I don’t want there! I have selected the hand to show first.
Once the part you want to delete is highlighted in orange, you can click the DELETE button on your keyboard to get rid of it. You can also do this through right clicking and going through the delete submenu, but the DELETE button is the fastest way.
After pressing DELETE, the part of the mesh is no longer there! Yay! Now we have to do that with all remaining parts of skin.
KEEP IN MIND, the front and the back parts of the skin are likely separated. If you are looking at the mesh from the front and delete, in this example, the stomach part, you MUST rotate to the back of the mesh and delete the back part!
Example: Stomach part selected
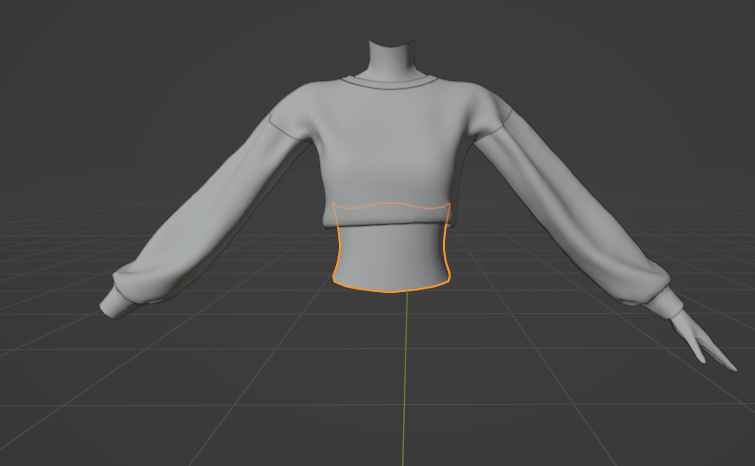
Stomach Part deleted, looks good right?
Rotating the camera using the MIDDLE MOUSE BUTTON (scroll wheel) by clicking and holding, then dragging the mouse to rotate
The back of the mesh still has skin, sneaky!
Keep this in mind when you are deleting skin, rotate the model to watch for this. Check in sleeve cuffs/pant legs/bottom of skirts, you never know where they are hiding!
PROBLEM: I think there is skin inside the mesh, but I can’t see it past the parts I want to keep!
The old hidden arm trick! If you think there is skin inside of the mesh that you can’t get to, select the part of the mesh you think it is hidden under so that it has an orange outline (for this, let’s say there’s an arm underneath the sweater), and press the H button on your keyboard. This will ‘hide’ the mesh, so you can delete something underneath it. To bring it back, press ALT+H on your keyboard, and that will unhide the mesh that you hid!
Another way is to select the mesh so that it has the orange outline, then go into your scene collection and press the little eye icon on the highlighted object (boxed in red below). That will hide that part of the mesh. To unhide, press on the eye again!
Deleting Unwanted Pieces
Now we have the skin out of the way. But there still may be parts of the mesh we don’t want!
In the Sims, the body basically ceases to exist when there is clothing on it. Sims creators cover that by something like this (this is the bottom of my sweater mesh):
It is up to you if you keep this section or not. If you keep it, it will show up in FF (so you cannot see up the top if looking at it from the bottom, for example). If you do not keep it, you will be able to see up the clothing. If you choose to keep this, skip this section and go to the next one (REJOINING THE PIECES).
If you want to get rid of them, there are two options depending on the mesh:
The pieces are a separate part of the mesh (Easy!)
If the pieces are a separate part of the mesh (for example, the top of my sweater has this separated out) then you follow the same steps as removing skin. Click on the piece of the mesh and press the delete button!
In this, my sweater has the piece separated, so I can just press the delete button and remove it!
The pieces are not separated/are joined with important pieces (Harder)
If the pieces are not separated or are joined with pieces you want to keep, we will have to delete the vertices manually.
For example, the bottom of my sweater has these pieces joined to the front and back of the sweater which I want to keep.
First, click on the piece you want to get rid of. It will highlight in orange. DO NOT PRESS THE DELETE BUTTON. This will delete the entire thing, which we do not want! Instead, press the TAB button on your keyboard to enter Edit Mode.

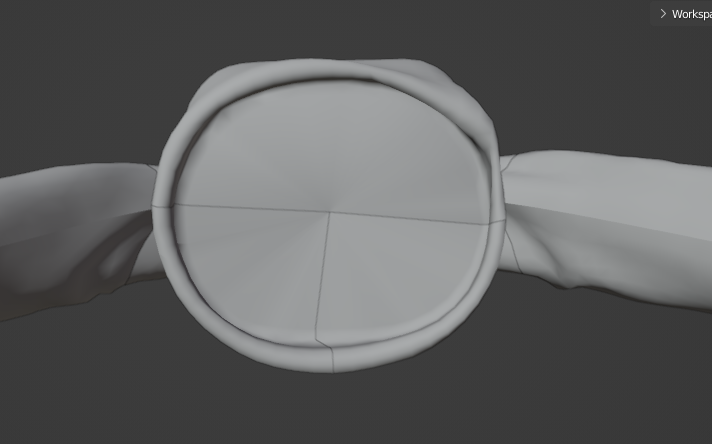
This is what my edit mode looks like at the bottom of the sweater. It usually has some sort of circle with little pie slices for a Sims4 mesh, so it will likely look similar!
Here, I’m going to click on the vertice in the middle of the circle that connects to all of the lines going outward. You can also left click and drag to select using the square tool, which you will automatically be on. Depending on how the mesh is laid out, it will look something like this:
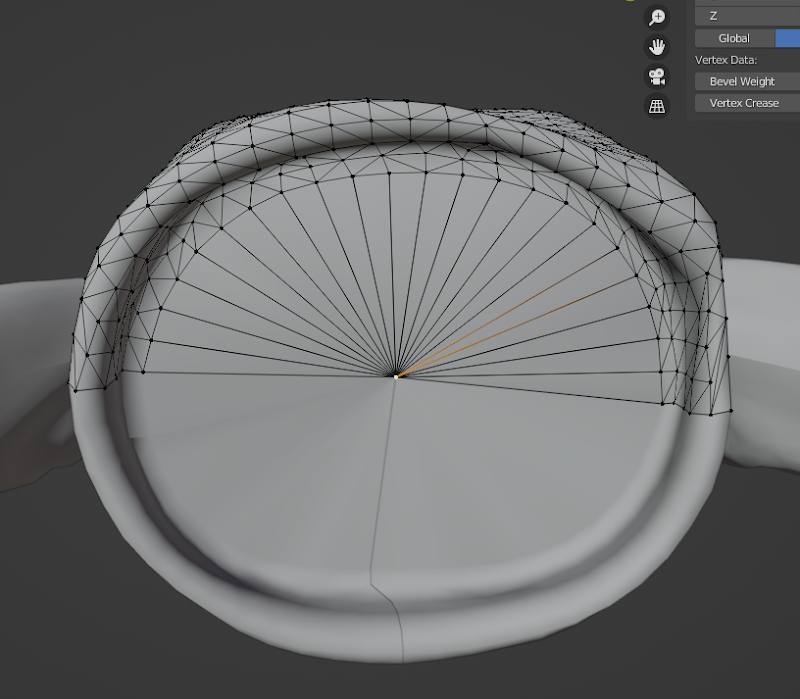
Press delete. A submenu will pop up:
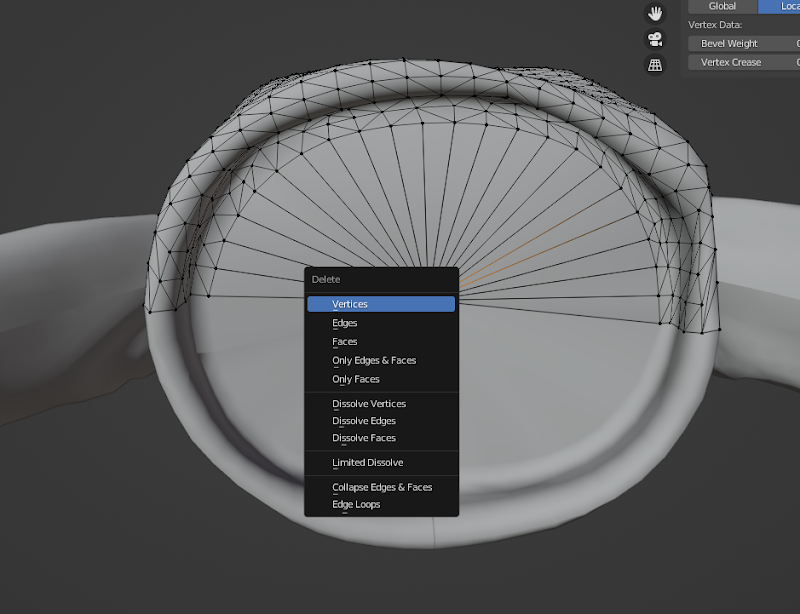
Select the ‘Vertices’ option to delete.
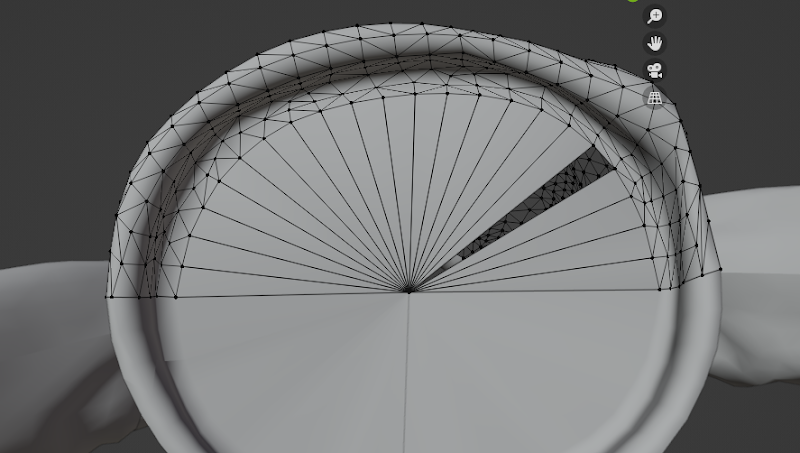
Depending on how the mesh is set up, it will have deleted one part, or perhaps all of it! Keep selecting that center vertice and deleting just the vertice, until eventually you will have something that looks like this:
Be careful when selecting the vertices that you aren’t deleting something that you want to keep in the rest of the mesh!
When you are finished with this section of the mesh, click in the viewfinder and press TAB again to switch to object mode, which will look like below. You can now select another part of the mesh and repeat the process!
Rejoining the Pieces
You now have all the skin deleted and the mesh how you want it. It’s time to rejoin the pieces! Click into the viewport (NOT ON THE MESH) to deselect any of the mesh. There should be NO orange outlines!
Press the ‘A’ button on your keyboard. Everything will light up, like so:
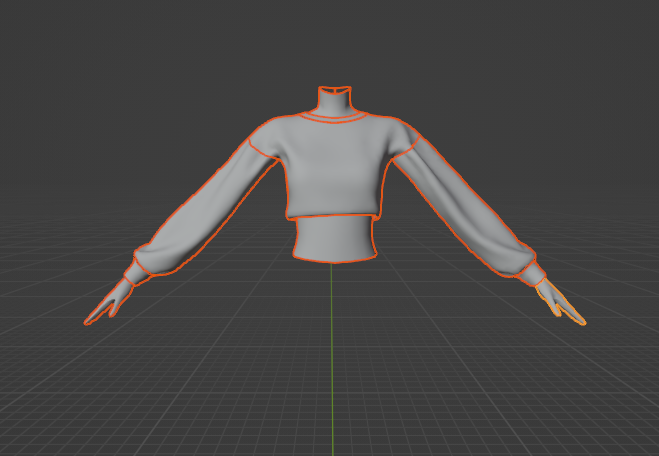
Hold SHIFT then click on one of the pieces of the mesh. It will be bright orange, where the rest will be dark (above you can see the left sleeve is bright!). Then press CONTROL+J, and all the mesh pieces will join together. You should now have something that looks like this:
Exporting the Mesh
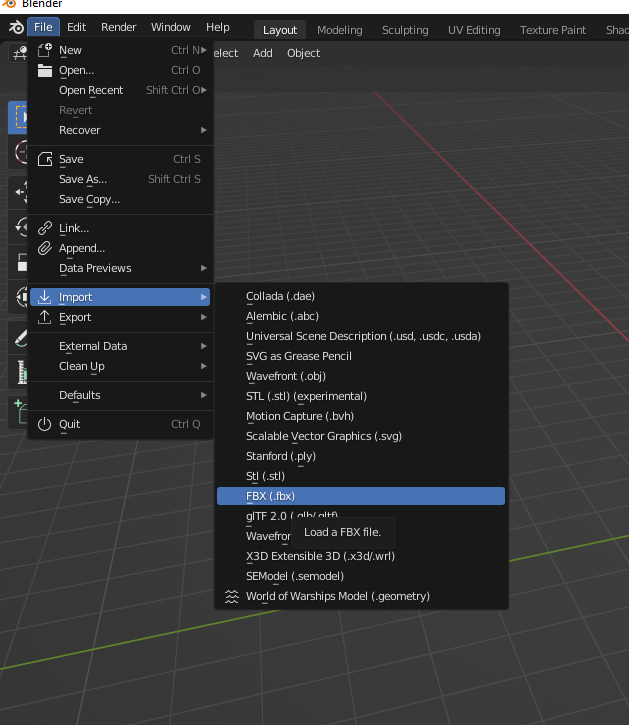
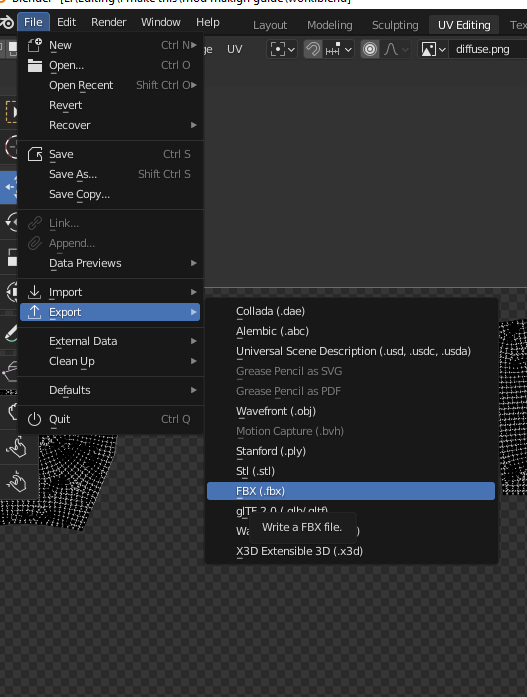
Now it is time to export! Go to ‘File’ in the top left-hand corner, go to ‘Export’, and click ‘FBX’.
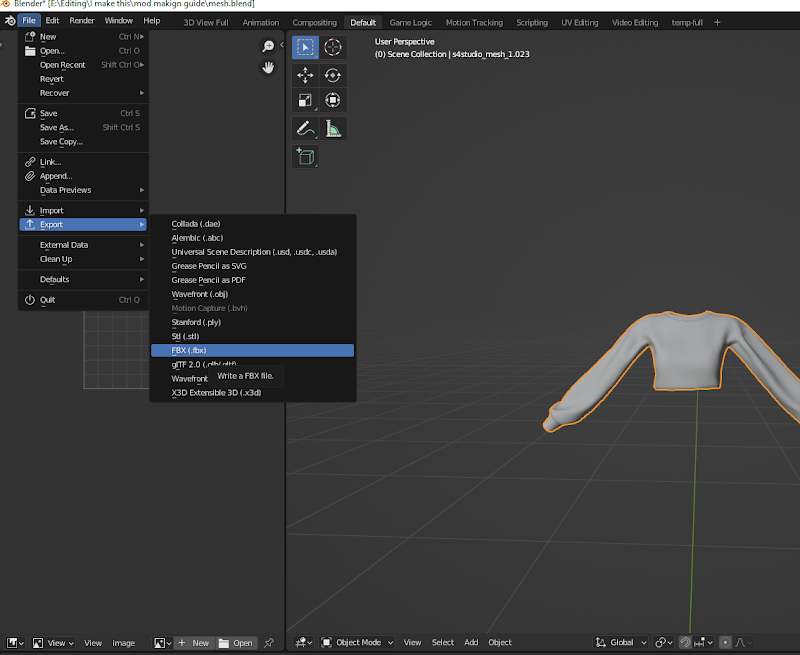
Save the FBX as something you will remember (I usually do ‘mesh’), and somewhere you can find it. Then you can exit out of this blender tab! (You can save if you like, or not if you don’t. We won’t be coming back to it now that we have our FBX).
Using Textools & Getting What We Need
There are a couple things we need before we go into Blender, all of which can be obtained through Textools. These are:
- The body of your choice
- The item of clothing you wish to replace
Textools Layout
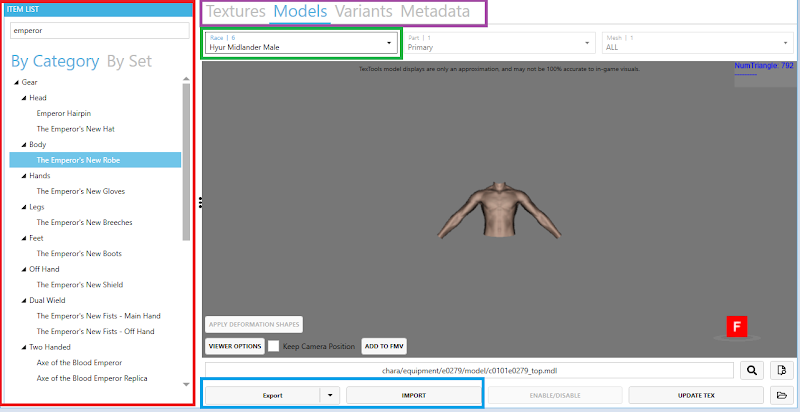
It can be a bit confusing at first, so I’ve once again colour coded things!
- RED: Item List. Includes item search in the top bar!
- PURPLE: Tabs. There are four usually (textures, models, variants, and metadata).
- GREEN: Dropdown Menus. There are three in the row across the top.
- BLUE: Import/Export buttons. This bottom row has options, which we will go over later.
Getting the Body
We will start with the body of your choice. Although you can use a DevKit from that body if you like, I find DevKits are often unwieldy and difficult to navigate through, plus lack some of the easy functionality that an FBX provides.
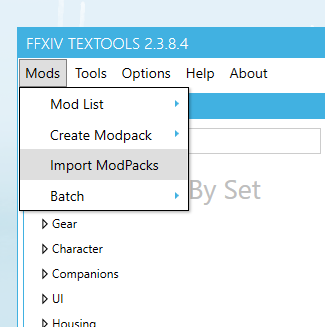
First, install the body you want into Textools. This can be done either by double clicking the mod in your documents and following the steps, or using the ‘Mods’ dropdown menu on the upper lefthand corner of Textools and using the ‘Import Modpacks’ button.
To make your life the easiest, I suggest using the Emperor’s sets, and will be using those as my example. You can do this from smallclothes too if you choose!
Once you have your body installed, search for the word ‘emperor’ in the item list search bar (or ‘smallclothes’ if you are using those). It’ll pop up the options, and depending on what you need, select that part of the body (feet, hands, legs, etc).
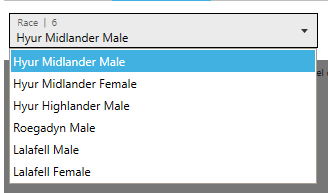
Here I have the Emperor’s Robe selected, as I’m working on a sweater so need a top to fit it to! To change which race’s top you see, use the dropdown menu (GREEN square) and select from there. Remember which races are Midlander based and so use their body textures, and which have their own unique ones! The list is included below. If your race isn’t listed, congratulations! You use Midlander textures & body shape.
Once you have selected your body/race in the drop down menu and confirmed it is the body you want, we will be clicking the arrow next to the ‘export’ button and clicking ‘FBX’.
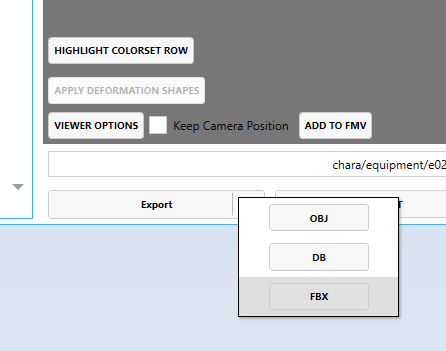
This will export the body piece as an FBX so that we can use it in Blender. This will be exported to where you directed Textools to save things, likely My Documents>Textools>Saved>Body>The Emperor’s New Robe>3D.
Do this for all body parts you need for fitting, but remember that you should not include extras when you are putting the model back into Textools. If you are working on a shirt, for example, it should not have hands! Look at similar pieces to guide you.
Put the body on the backburner for now, now we need to find some gear.
Getting the Gear
Now it’s time to pick what you want your piece to go on. Tops should go on tops, bottoms should go on bottoms, shoes should go on shoes, etc. You don’t have to match what the mod looks like to its vanilla counterpart (ie long sleeve vanilla top doesn’t have to be a long sleeve modded top, it could be a tank top) but it has to fall into the same category or everything goes a lil funky.
Use the same process you did for the body, searching for your item, ensuring that you have the correct race from the dropdown menu, and export the FBX. Keep track of what items you pick, we will need those later!
Into Blender (Part 2!)
Whew! Our mesh is all prepped up and ready to be fitted to the body of your choice. Open up the current version of Blender. It’ll bring up the ‘welcome’ popup when you enter, you can just click away from that
A reminder: SAVE YOUR WORK. Save often! You WILL be coming back to this Blender file, so you MUST save!!!
Blender terms & layout

Blender can seem like a lot when you first get into it! I’ve broken down the parts to make it easier.
- RED: Viewport! This is where your 3D work is done.
- GREEN: Mode Selection. This is where you select what mode the viewport is using.
- BLUE: Scene Collection. This is where the list of all of your parts live.
- PURPLE: Properties Editor. This is where you can change things about your mesh.
There will be other parts we use as we continue, but I will explain each when we get there.
Remember, the SCROLL WHEEL zooms in and out. Clicking and holding the scroll wheel rotates the camera. Holding the SHIFT key and then clicking and dragging the scroll wheel pans the camera.
Setting Up Our Blender
To begin, we have junk on the screen again. In the Scene collection (BLUE), you can see that there is a camera, cube, and light. Just like before, click on the top object (the camera), then hold SHIFT and click on the bottom object (the light). Press the delete button, and we’ve got a clean workspace!
Next, we’ll want to import that mesh we worked on. Go to the top left corner to go to File>Import>FBX, and import the mesh from where you saved it (pictured below).
Once you import that FBX your model should show up in your viewport.
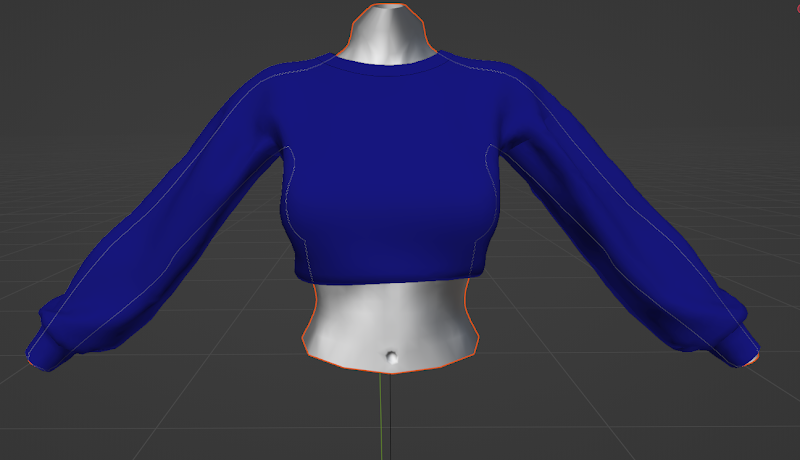
Next, we want to repeat the same process for bringing in the vanilla item that you are going to be replacing with your mesh, and the body that you want to shape it around. When you’ve finished, it should look something like this:
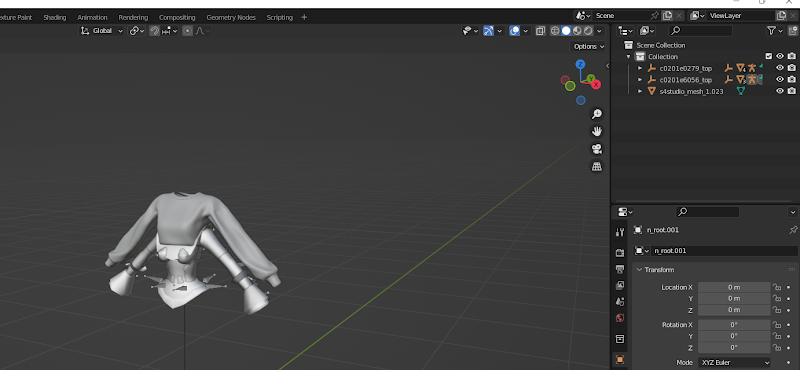
In your scene collection on the right hand side, you can press the ‘down’ arrow next to the three-pronged orange objects to expand them.
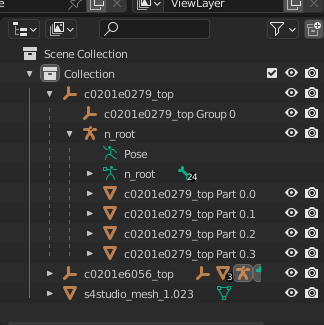
The meshes will have several parts each. Don’t delete them quite yet!
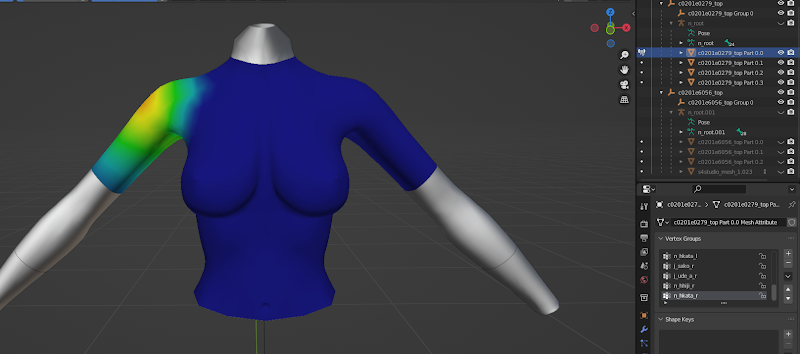
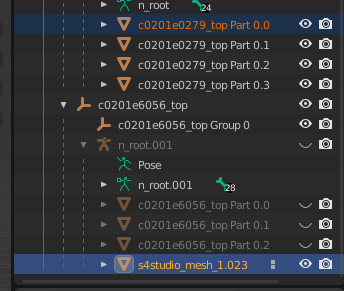
Find which object is your vanilla top. For me, it is c0201e6056_top – basically, the second one in the list. I’m going to expand that (you can drag your scene collection window down more if you need) so I can see all the vanilla parts.
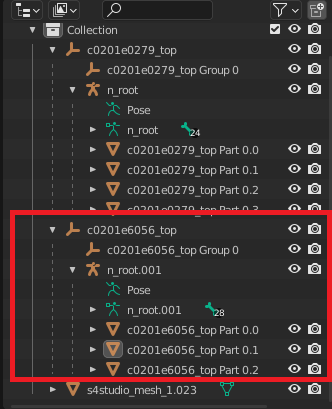
The items in red are my vanilla top objects. Take note of which n_root is for the vanilla objects (in this case it’s n_root.001). Here is where we diverge slightly:
- IF your new mesh is skin-tight (a tight sweater, pants, shorts, etc.), you can delete the vanilla objects that have the TRIANGLE next to them. Do not delete anything else!
- IF your new mesh is NOT skin-tight (ie dresses, long skirts, etc) DO NOT delete anything! Instead, hide the TRIANGLE objects using the eye button on the right hand side of them. You will need them later.
My mesh is skin-tight, but I will just hide the vanilla objects for now.
You can also hide the n_root for both the body and the vanilla object. DO NOT DELETE THE NROOT! It is basically our ‘skeleton’ in the game. Just hide it using the eye button.
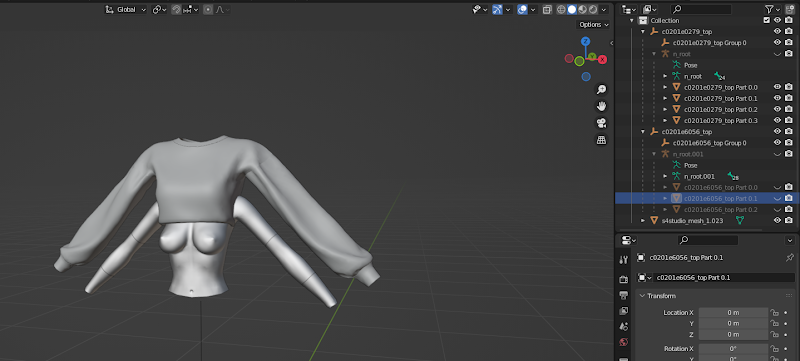
This is what my viewport and materials list now looks like. We are all set up and ready to begin.
Changing Relations

To get our mesh in the game, it needs to have a skeleton. We are going to ‘steal’ the skeleton of the vanilla item that we grabbed.
Select your sims mesh (this can be done in the viewport or by clicking on it in the scene collection list). In our Properties editor, we want to go to the tab with the orange square, then click on the box that says ‘relations’
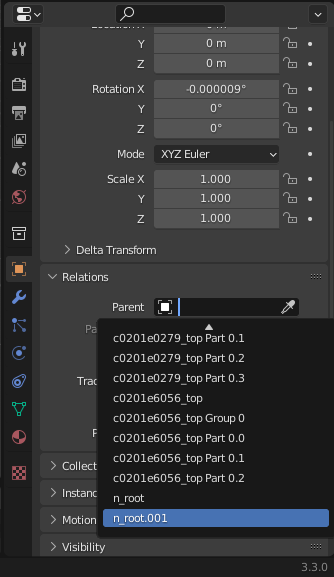
Once in the Relations tab, click on the black box next to ‘Parent’, and scroll down until you find your n_root for the vanilla objects that we noted above. Click on it.
YOUR MESH WILL MOVE, AND THAT IS OKAY.
As you can see on the left below, my mesh has faceplanted itself forward. This is NORMAL! In the tab above ‘Relations’, the tab called ‘Transform’, you’ll want to set your Rotation X to -90 degrees if the mesh has faceplanted forward, or to 90 degrees if it fell backwards (see the picture on the right below). It will snap back into position standing straight up!
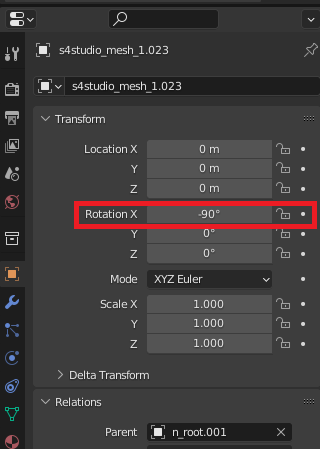

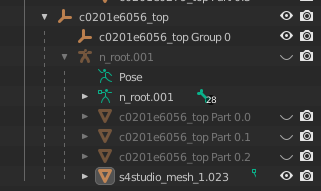
In your collection list, your sims mesh should now be sitting under the n_root of your vanilla items (like below!). If it is not, doublecheck the relations tab again, and make sure you have assigned it to the correct n_root!
Fitting
Now we have everything where it needs to be and a clean mesh. Time to fit it! You will notice that Sims meshes are usually larger than what we use for FF.
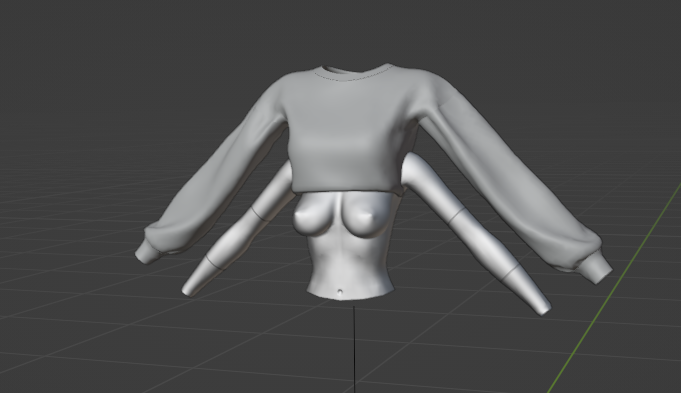
Even if I were to move the sweater down, it would still be too big! So we are going to size it down as well.

In your viewport on the left hand side, there is a line of tools (see to the left). If you don’t see them, press the ‘T’ button, and they should pop out!.
We are currently on the selection box tool, the orange box with an arrow in it.
Under it is the cursor (we will not be using this). Then come our most important four:
- The arrows is Move
- The circle arrows is Rotate
- The two boxes are Scale
- The compass circle is Transform
We will be using a combination of those tools to make our mesh fit onto our body to start.
First, use the Scale button (the two boxes) to scale down your mesh (you must click on the mesh, then you can use the tools!). The three coloured lines will scale in their specified direction, but if you just grab inside the white circle you can scale uniformly down.
If the scale gizmo is difficult to see because it is sitting at the floor in the center, we can bring it up to the mesh. In the upper left hand corner of the viewport, there is a ribbon text to the Mode Selector. Click the button that says Object>Set Origin>Origin to Geometry.
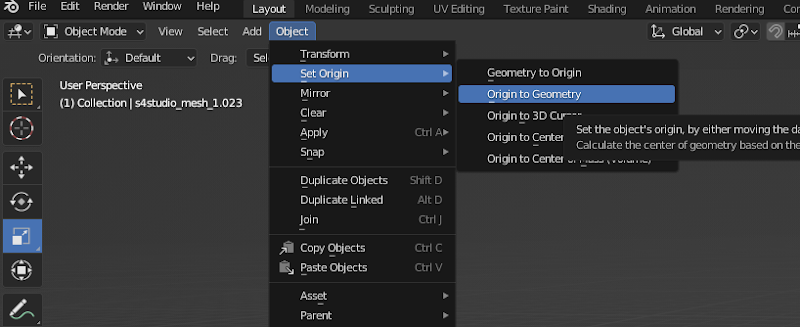
This will move your gizmo up to your mesh, so you can work with it closer up.
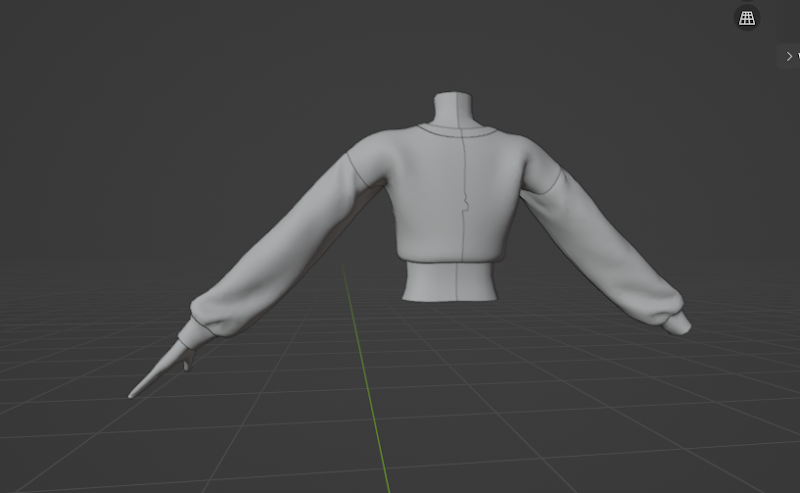
From here, continue to scale/rotate/move the mesh as needed to get it close enough to the body (as above). When you feel that you’ve moved the mesh as close as scaling, rotating, and moving can get you, it is time to move onto the next step. Don’t worry if it doesn’t look perfect at this stage! It likely won’t, as Sims proportions are different from FF (their arms are MUCH longer).
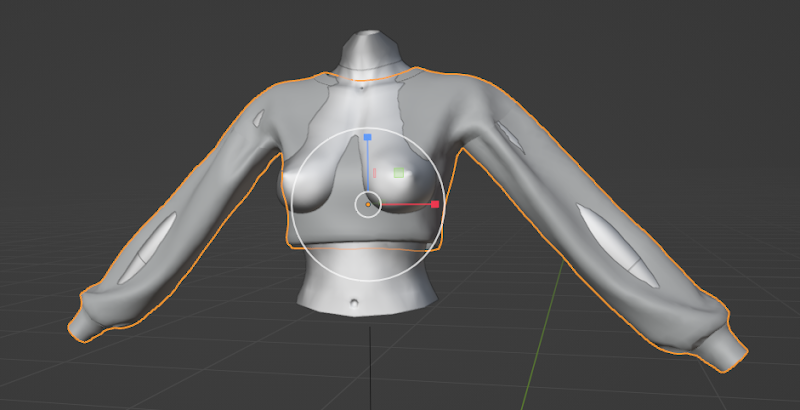
Fitting (Sculpt Mode)
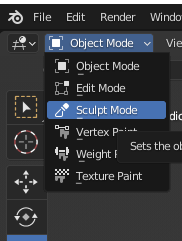
Now our mesh is in the right area and kinda the right size, but we need to move things around more to get it to really fit. We will be going to mode selection (in the top left hand corner) and selecting ‘Sculpt Mode’. We still have to be selected on the sims mesh we’re working on to enter this mode!

The left side of the screen will have a TON of different brushes and things. We are not going to be using all of them, do not worry! These two brushes will be your best friend (shown on the right). The top (pointy yellow) is Grab, and the bottom (Smurf Hat yellow) is Elastic Deform. These are the two that we will be mainly using to fit the mesh.
To note, there is a way you can do this with lattices. I hate it and it doesn’t work that well, so I recommend against it.
Start with the surface deform brush (the smurf hat looking one).

This preview is a lil tiny but on the left side in red you’ll see your Radius & Strength sliders – these change the size of the grabbing brush (radius) and the strength (how hard with how much of the brush does it pull).
On the right in green you will see the symmetry options- I would select X to begin, as that will mirror your motions across the X axis and make less work for you!
Adjusting the radius as you need (bigger for bigger area movements, smaller for smaller), pull the mesh out so you cannot see the body underneath. Take your time here! Rotate the camera, look at all angles. Elastic deform is elastic- if you move one part, the other side will move correspondingly. If you do not want that, switch to the grab tool, which will ‘grab’ the vertices and move them.
Eventually you will want to turn off X axis mirroring so that you can work on one side at a time, as the meshes are usually not completely symmetrical.
PROBLEM: How do I deal with the super long arms?
You’ve reached the part of your fitting where the arms are too long. The way I do it is likely not the technically correct way to do it, but it works!
You’ll want to be in Elastic Deform mode, and I make the radius LARGE- usually around 150-200, sometimes more.
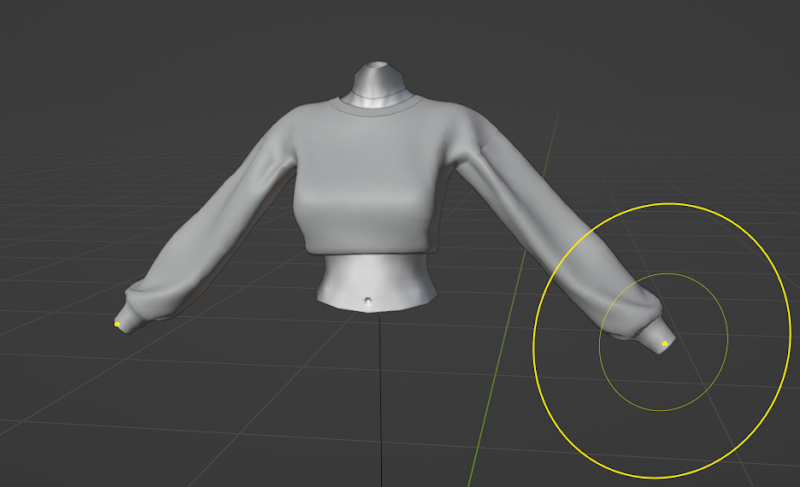
Make sure you have symmetry on, and grab the end of the sleeve, like shown above. Then drag the sleeves up towards the shoulders until you can see the wrists. Go back to small work to fix all of the clipping issues!
Weighting
You’ve fitted your model so there are no clips and it is fit to the body you want. Fantastic!
Next, we have to weight our mesh. We can use weight transfer to begin. Here is again a point of divergence if your mesh is skintight or not.
Quick Blender Weight Overview

Weight mode is found in the mode selection in the top left hand corner. These are the tools to the left.
The brush is draw, the drop is blur, the dots are average, the finger is smear, the line is gradiant/radial, and the eyedrop is sampler.
The radius and strength are at the top, same as they were in sculpt mode. Radius again controls the size, whereas strength controls the strength of the weight. Zero is no weight, and 1.00 is ALL the weight.
In weight mode, blue is “light” (it will move), and red is “heavy” (it won’t move).
How Do Weights Work?
In Blender, weights are assigned per vertex group. For us, each vertex group represents a ‘bone’ in the FF skeleton. If you look at the body you are using and its weights, it will look something like this:
Where blue is light/not affected by the weight in that vertex, and each colour closer to red is more affected by the movement of that bone. Now is a good time to reference the Textools Reference Guide, which has a tab which lists all of the bones.
The name of each vertex group will correspond to the name of the bone. If this doesn’t make any sense to you, that’s okay! You will see it in action below.
Weight Transfer
Here is the divergence point. If your mesh is skintight (aka not a dress or a skirt), you can go to the first section. If your mesh is not skintight, go to the second section.
Skintight
You have the easier weight, congratulations! You are going to click the object you want to steal weights from (this can be the body mesh or the vanilla mesh!) and then press and hold CONTROL to click on the item you want to weight. It will appear in the scene collection like this →
Where the dark orange is the object we are STEALING weights from, and the light orange is the object we are transferring weights TO.
PROTIP:
Here, I’m doing weights from the bibo top to a sweater. Personally, to make my life easier, I will combine all the parts of the bibo top (part 0.0 to 0.3) together (using the CONTROL+J like we did earlier) to weight transfer instead of doing each part individually, as there can be issues with overwriting vertex groups. After doing weight transfer, I just import a new version of the body to use.
I will be using this tip as I work, so examples will show this!
After you have both objects selected as described above, you are going to go to the mode selector in the upper left hand corner and select ‘weight paint’. When you go into weight mode, the object that you are weighing (your Sims mesh) will turn blue, like this:
If it does NOT turn blue, but something else does, you’ve messed up your clicking in the step right before this. Go back and try again!
If it does turn blue, continue on!
In our Properties Editor, we are going to navigate to the tab with the green triangle (shown here →). We are going to be working with the ‘Vertex Groups’ tab in a bit.
Next, you are going to go to the upper left corner of the viewport. In the ribbon next to the mode selector there is a button that says ‘Weights’. Click that, then click ‘Transfer Weights’.
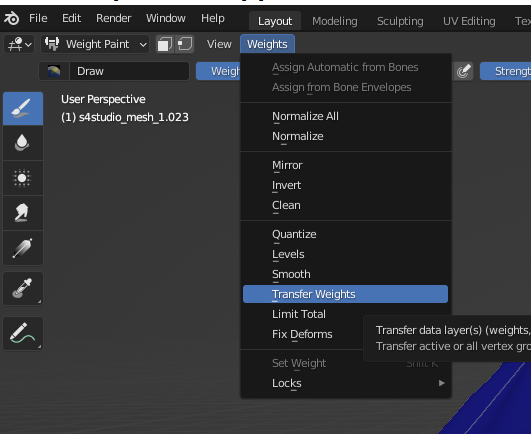
Clicking that will pop open this little tab (
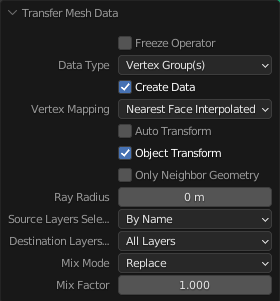
You can also use Nearest Edge Interpolated in the vertex mapping drop down, that’s personal preference and can depend on the mesh.
You will see in your properties editor a whole bunch of things have popped up in the Vertex Groups window. These are our bones!
You are all done, go to the After Transfer section.
Not Skintight
If your mesh is not skintight, you are going to be stealing the weights from a vanilla item (likely the item that you decided to put your Sims mesh onto). Good ones to use are the Plain Long Skirt for long skirts, the Matriarch’s dress for long dresses, or the Neo-Ishgardian tops for asscapes.
Instead of stealing from a body, as the steps above, you are going to select your vanilla item as your base item. Follow the steps above with that change.
When grabbing weights from vanilla items, sometimes they won’t be the best for the skintight parts of your mesh. You may have to transfer group by group from the body that you are using.
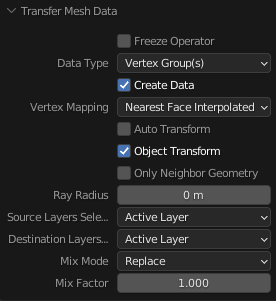
To do this, leave weight mode, click onto ONLY the mesh that you are weighing, and open back up the ‘transfer weights’ menu by following the same steps as before (you won’t have anything to transfer, that is okay!). You are going to want to change your transfer settings to this →
Then click off and leave weight mode, back to object mode again. Click on your body that you are stealing weights from, and go to the green triangle tab in the Properties editor. Select the bone weight you want to steal from the Vertex Groups list, like so:
You are then going to press CONTROL and click on the Sims mesh, and find the vertex group that is named the SAME and click on it so it is highlighted like the above picture. The vertex groups should be identical, watch out for _l or _r differences.
With that, you are going to enter weight mode and go to transfer weights. This will replace ONLY the vertex group that you have selected because we previously set our transfer settings to do this.
You can go vertex group by vertex group and do this for each part that needs it. If your Sims mesh doesn’t have a matching vertex group to transfer to, here is how you add it:
Go to the Vertex Groups in the Properties Editor (the green triangle tab) of your Sims mesh. Along the right side of the tab, you will see several small buttons. Press the + button to the right of the vertex groups.
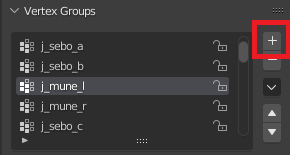
This will create a new Group (
After you have renamed it, you can then go through the active layer transfer process again, using this vertex group.
Once you are happy with your transfers, move on!
After Transfer
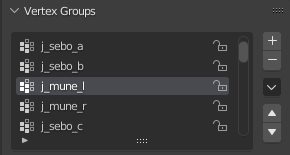
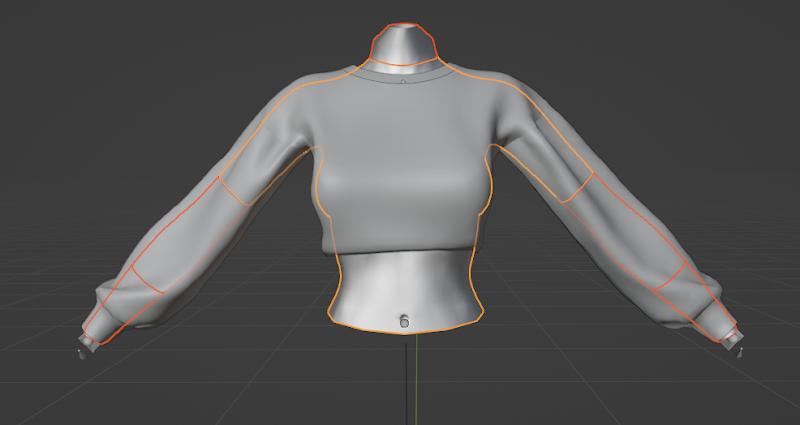
This is the boring but necessary part. Cross reference the Textools Bone List and your vertex groups of the Sims mesh, making sure that the weights are around the areas that the bones are (for example, j_mune_l, which I have selected above, is the left breast. The weights should be around the left breast).
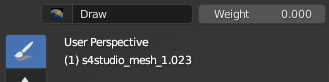
If there are weights where they shouldn’t be, go to weight mode and select the draw tool, and set the weight to zero, as seen here →
Then draw over the areas where there are weights that should not be there. They will turn dark blue, which is what you want!
It is also likely a good idea to blend the edges of your weights- use the blur tool (right under the draw tool) along the edges. This makes the weights less chunky and look nicer.
To Note
This is a rudimentary weighting guide. You will likely have to play with the weights a lot more and do tests in game. I suggest testing on all the races it affects and doing a wide range of vanilla emotes (I always use the Manderville Mambo because it has a huge range of movement, plus a lot of others).
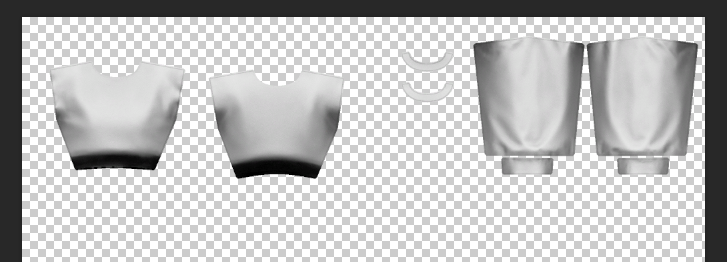
Skin Mesh
Now everything is weighed, we have just a couple steps left in Blender.
If your object shows any skin, you will need to have the skin there. I have re-imported the body that I was using (because I joined it for weighing) so it is broken down into bits.
As you can see from my mesh (where I have all the body highlighted in orange) there are parts where the skin cannot be seen! For example, in the middle of the sleeves. We can safely delete those parts of the skin, as they cannot be seen. However, we still need the wrists, torso, and neck.
Just like we did in the Changing Relations section, we are going to go to the Properties Editor to the tab with the orange square, and change the relation of the body to the n_root that has our Sims mesh with it! As to not clutter the document, I won’t be going over the process again, but if you need a reminder just pop back up to that section.
Deleting a Hierarchy
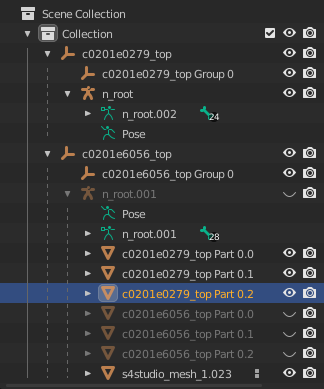
Once your skin mesh is transferred to the proper n_root, your scene collection will look something like this →
We don’t need some of these things! The group that the skin came from (the three-pronged orange bit that has the empty n_root under it and no orange triangles) can be deleted. But trying to delete it on its own goes all sideways very quickly. Instead, select the three pronged orange group where the skin came from, right click, and select ‘Delete Hierarchy’, like so:
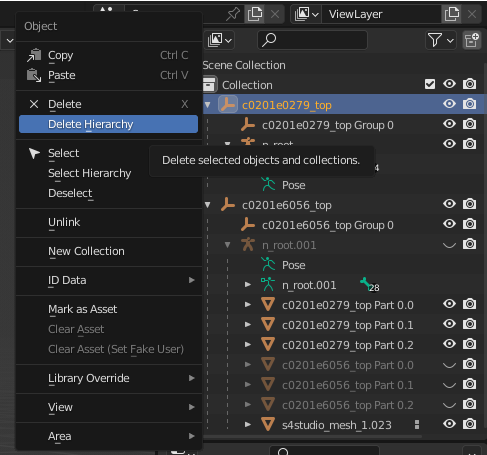
This will clear up your scene collection, and get rid of the unnecessary bits we no longer need.
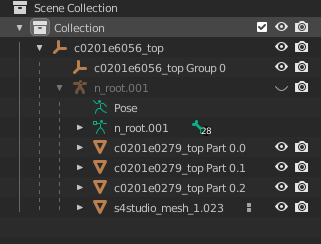
Vanilla Mesh
If you have any leftover vanilla mesh bits that you were using for weights, now is the time to get rid of them. You can simply click on them and press delete! Your Scene collection should now look something like this →
Finishing Touches
There are just a few small things to do before we leave Blender. Almost there!
Rename Sims Mesh
As you can see in the picture above, my Sims mesh is still named s4studio_mesh. We have to rename it. The easiest way is to copy the name of the main group.
- Double click on the name of the main group and copy it (CONTROL+C)
- Double click on the name of the Sims mesh and paste it (CONTROL+V)
- At the end of the name, add ‘Part 1.0’. If your mesh has multiple parts, name each separately (you can use 1.1, 1.2 if they are on the same material, or 2.0, 3.0, etc. if they are on different materials)
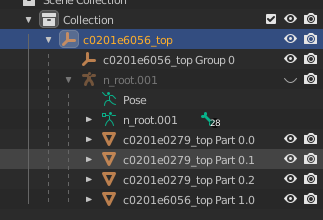
Part 0 is for skin, if your mesh has it! If it does not have any skin, you can use Part 0 with no worries.
After renaming, your scene collection should something like this →
Adding Armatures
For EACH mesh on the list (each orange triangle!), we need to add an armature. To do this, we go to the Properties Editor, to the tab with the blue wrench (
Press the drop down menu at the top of the section called ‘Add Modifier’ and click the ‘Armature’ button under the Deform section. It looks like this:
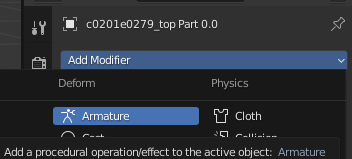
Once you click that, you will get a block in the properties editor list that looks like this:
That’s it! Do this for EVERY orange triangle in the group.
Triangulate
Now that each of the mesh parts have armatures, there is one last step. Select your sims mesh and press the TAB key to enter Edit Mode (or you can use the Mode Selection in the upper left hand corner). Everything in the mesh should be lit up orange. If it isn’t, press the A button and it will be!
With everything selected in orange, press CONTROL+T. This triangulates the mesh, which is a requirement for Textools.
After that you can press TAB again to exit edit mode.
Make sure you save your Blender work! We will be hopping to a different program for a bit before coming back to Blender to finish up.
PAUSE BLENDER, ENTER PHOTO EDITING
Enter Photo Editor & Open Your Diffuse
It’s as the title says really. I use Photoshop, but any photo editor that allows you to see the channels of images (GIMP, I think FireAlpaca does, Photopea, etc) will work. Open your photo editing program and open the diffuse that you saved back at the beginning. It should look like a long rectangle. We need to crop it!
Crop Your Diffuse
Select the ‘Crop’ tool (
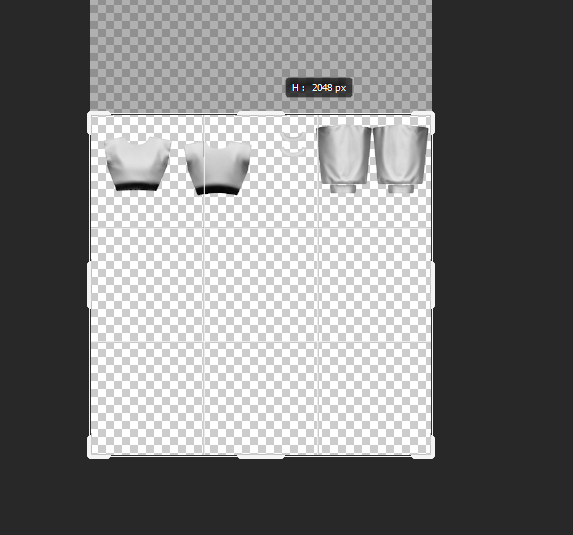
The height should be 2048 pixels. Textools ONLY works in even numbers, so your diffuse MUST BE AN EVEN NUMBER.
Once you have cropped your diffuse, export it or save it as a PNG (whatever your photo editing software allows). Now, back to Blender!
BACK TO BLENDER
We have returned to Blender! In the very top ribbon, there is a tab that says ‘UV Editing’. We are going to click on that.

UV Editing
This will shoot your camera extremely far away, and open up a new half of the screen, like this:
Our LEFT half is our UV Editor, and our RIGHT half is our model viewer. In our UV Editor, at the top we are going to press the folder that says ‘Open’. We are then going to select the diffuse that we edited (so it should be a square, NOT a long rectangle). This will pop your diffuse into the UV editor, so it should look something like this →
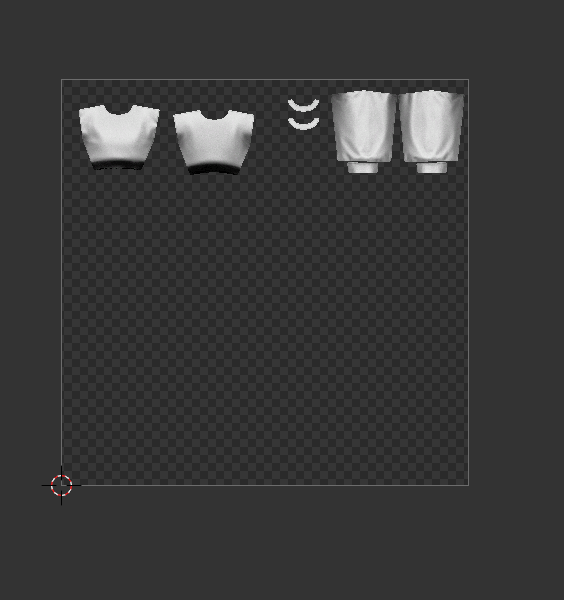
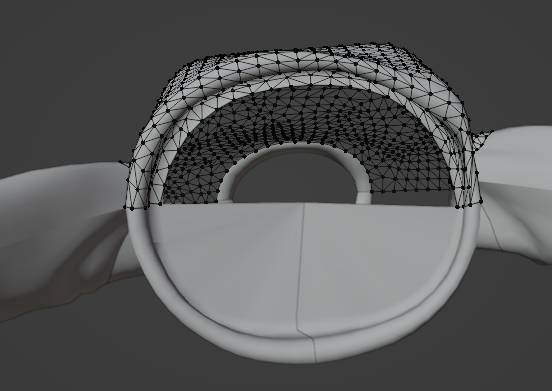
We are then going to hover our mouse over the model viewer, and press A so that the entire model is highlighted orange. Weird black shadows are going to show up on the UV side- those are our UVs that we are going to be working with!
UVs basically tell the game what texture is supposed to go where, so it is important that we place them correctly on our diffuse.
Move your mouse back to the UV Editor, and press the A button. This should highlight all of the black shadowy bits in orange, so that we can edit them. We are going to be using the same tools as earlier (Move, Rotate, Scale) to get the UVs into place.
The Scale button (
We are going to drag the GREEN arm of the scale gizmo up to stretch the mesh out. When you think it looks stretched out enough, use the Move button (
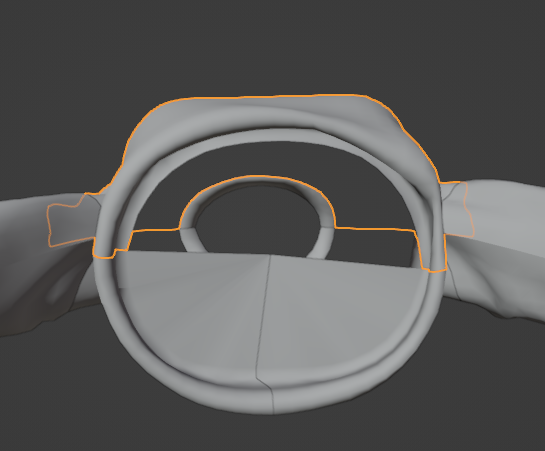
If you have isolated spots in the UV that need to move or scale more on their own (for example, I have those two semi-circle bits which are the neckline. I can move those two separately to make them fit onto their part of the diffuse.
WARNING: DO NOT move individual vertices of your UV! The UV is already set up for you by the Sims creator who made the mesh, you do not need to screw around with it (and doing that can and will cause problems!)
Example
GOOD UV ALIGNMENT:
All of the uv vertices are ON the diffuse, none are hanging off the edge into the transparent zone, and they are all uniformly scaled.
BAD UV ALIGNMENT
Some of the UV vertices are OFF the diffuse and are hanging into the transparent zone, one vertice has forgotten to be selected and has been left behind, leaving a stretched triangle in its wake. Go back and fix this!
Once your UVs are in place, it is time to finish with Blender.
Export Your Mesh
Same as where we imported meshes, go to the top ribbon in the upper left hand corner and select File>Export>FBX
Save it as something you will remember (I usually use weight 1, because it is likely to be the first iteration of a line of adjustments). You are free from Blender! (for now…)
Textures
It is time to deal with our textures. If you have Substance Painter, you can take the textures into there and deal with them. We will not be doing that in this guide.
Diffuse
Keep in mind, diffuses are OPTIONAL. You can just use a multi and a normal, but that requires you to make a multi (or rather, you SHOULD make one if you do this, but sometimes people don’t which makes the mod look flat/cartoony. Fair warning!). With Sims meshes, I recommend keeping the diffuse, because it often has shading or patterning in it that can be nice.
If you only have one diffuse, it is already dealt with. Congratulations! Move on to the next step.
If you took more than one diffuse in our original Diffuse step, you will need to crop each of them the same as in the Crop Your Diffuse step. Remember, they should be 2048 pixels high, NOT a long rectangle!
Normal
We now have to deal with our normal. We will be using Titan’s Hand Painted Normals file.
Open the file in your photo editing software. You will also need to open the normal file that you saved from Sims4Studio.
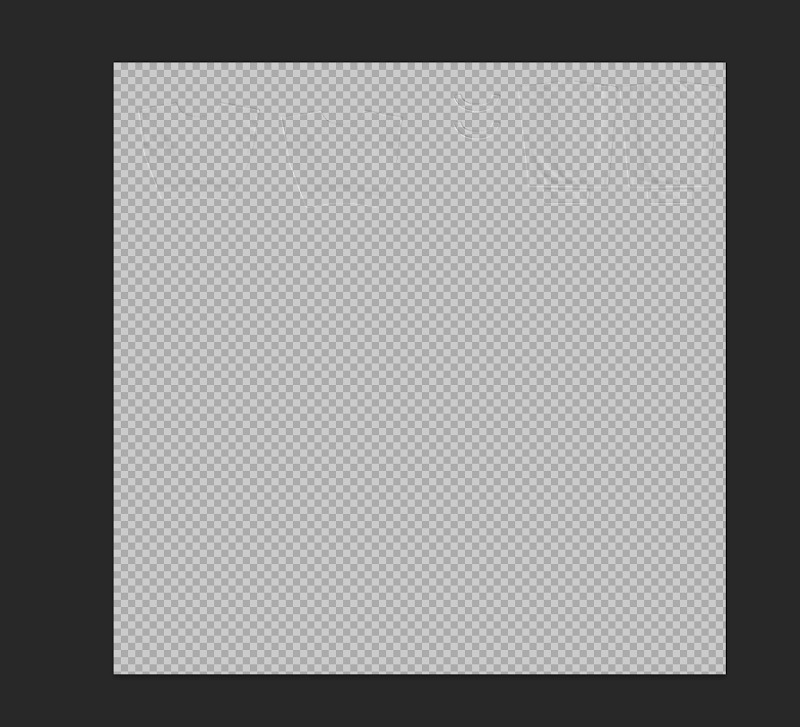
Your normal will look like this: (it is VERY HARD to see, that is okay!)
You will have to select the entire thing, using the select (
You are going to paste the selection onto the layer called “Paint Layer”
The shape will be quite indistinct still. The next step will fix that.
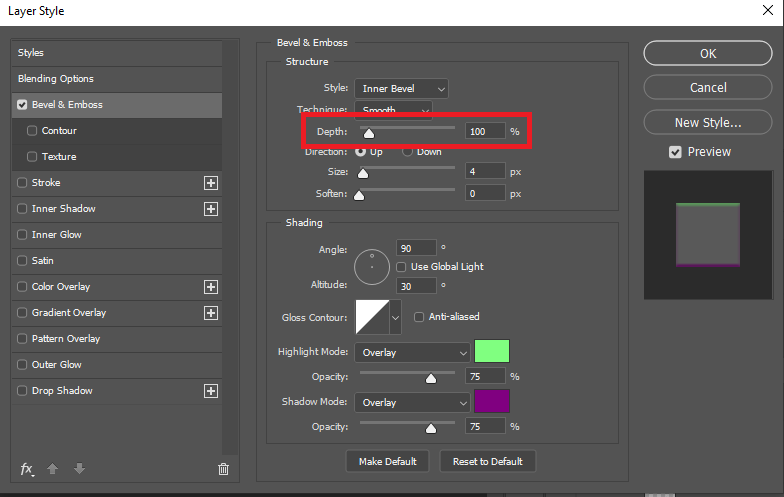
We are going to double click on the ‘Bevel & Emboss’ in each axis folder, one at a time.
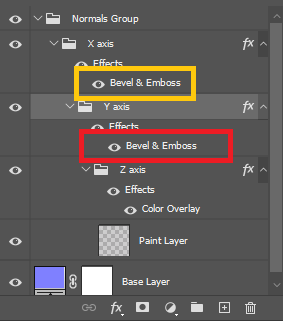
They are outlined in Red and Yellow here →
This will pop open a Layer Style box like below. We are ONLY going to be touching the ‘Depth’ slider, boxed in red below. I usually bring it up to anywhere from 250-600 for each, depending on what looks right. Once you are done, press ‘OK’. Repeat for the other axis. You DO NOT need to touch the Z axis! Once you are happy with the normal, you can export it as a PNG.
Alphas
You ONLY need to do this step if there are sections of the mesh that you want to be on different colourset rows (for example, if there is a bit of the mesh that is metal and you want to STAY metal, regardless of dye).
You will need a .dds saver if you are using Photoshop, or the ability to save as a .dds in your photo program. This website explains the two different plugin options. I personally use NVIDIA, so my examples will show that.
These are much easier to do in Substance, so I recommend doing that. This tutorial will only be in Photoshop though, so away we go!
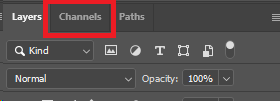
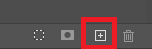
Open your modified normal in your photo ed and navigate to the ‘Channels’ category. Once there, you are going to add a channel using the plus button, as seen here →
This will create an alpha channel, which is black. Refer to the Textools Reference for colourset values- these will be the colours that you draw on the alpha with (aka you will draw in #FFFFFF for row 16, etc). They will ONLY be in grayscale.
You have two options: hand colour in the sections that you want a different colour, or use a selection tool to select the area and then fill it. Choose your own adventure depending on what you like/how fine the detail is (or use a combination of both!). Keep in mind that there will be colour ‘bleed’ if you are drawing, so assign at least two colourset rows per final colour you want to appear. When in Textools, you will follow the reference to assign rows according to what colours you drew on the alpha.
Example
I wanted my sleeves of the sweater to be a different row on the colourset so they could be dyed independently or set to undyable.
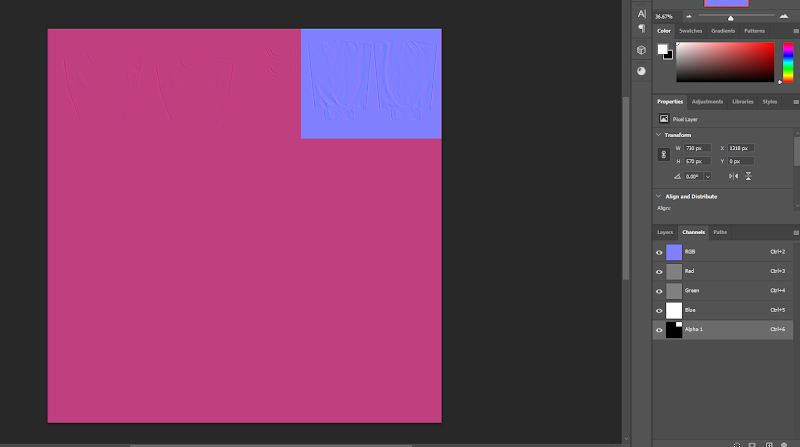
As you can see, I have filled in a square that contains the sleeves with white, so they will be row 16 on the colourset (following the reference guide, as white is row 16), and the rest of the mesh will be row 1 on the colourset (as black is row 1).
Your normal will look pink, this is NORMAL (eyyyyyy).
Now you need to SAVE AS a .dds file. DO NOT EXPORT AS A PNG, THE ALPHA WILL NOT WORK.
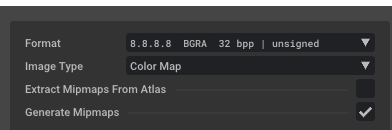
Textools deals with .dds in the 8.8.8.8 format. The only export setting you need to update is changing the format in the upper left hand box, as shown here →
Then you can save it, and you have your normal with an alpha!
Multi/Specular
They mean the same thing, no worries. These are basically a ‘shadow’ map, how much the dye clings. You have two options:
-
Leave it alone (not recommended)
This is the easier option, but it will make your garment look a bit ‘flat’. You can kind of get around it by using the diffuse option in Textools (we’ll talk about it), but it is kinda lazy and not very good practice. Instead, try:
-
Making a Multi (recommended)
This is the slightly harder option, and requires some photo editing. This is part of why I chose the white diffuse at the beginning, to make this easier.
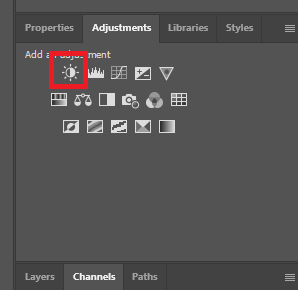
Open the white diffuse in your photo editing software. I am using the Brightness adjuster (in the red box to the right), but you can also use Hue & Saturation in your photo editing software. We are trying to turn the white diffuse as desaturated and bright as possible while still keeping the detail.
I have illustrated the process in the picture below so you can see what it looks like!
This is the original diffuse. I am now going to use the brightness adjuster to make it brother
This is after I have used the brightness editor. You can see that there is still some of the detail juuuuust barely visible.
I am now going to go into the channels section, and in the GREEN channel, I am going to use a while brush (or you can use fill, that works too!), and paint the ENTIRE green layer with white.
Once you do that, this is what your image will look like
From here, I am going to use the Brightness adjuster again to make it so that the green is just visible (the parts that were originally black are going to be more visible, so I am ignoring those for the purposes of adjusting the brightness)
This is what it looks like afterwards! You can now export this as a png, and it will serve as our multi.
We now have all the components together that we need to put everything together and test it out in game.
Putting it all together: Textools
Make sure that you still have your base body textures installed in Textools (or install them if you do not have them in there), as we will need them for packing the mod correctly.
WAIT WHAT ARE SKIN MATERIAL PATHS
If you are using bibo/a bibo based body, your skin material path will be /mt_c0201b0001_bibo.mtrl
If you are using TnF/a Gen 3 based body, your skin material path will be
/mt_c0201b0001_b.mtrl
If you are using TBSE or any variant, your skin material path will be
/mt_c0101b0001_b.mtr
Adding Materials
Navigate to the vanilla item that you want to replace using the same steps shown in the Getting The Gear and related Textools sections in that category. Make sure you select the correct race in the dropdown menu, just as before.
In the bottom ribbon (where we found our import/export buttons), we are going to press the ‘more options’ button, which will pop open a secondary ribbon.


We are going to press the ‘Add New Material’ button on the new ribbon that pops up. For Sims meshes, you usually only need one material. A new window will pop up:
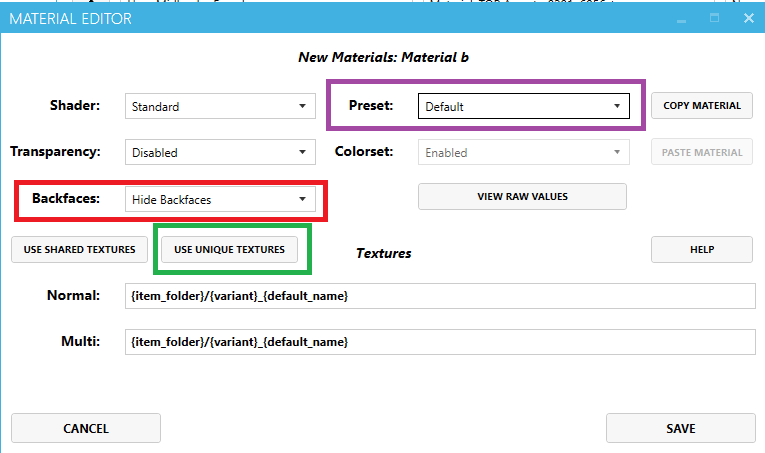
There are three areas to worry about:
- RED: this shows the back facing parts of the mesh. If you can see down the shirt, for example, I recommend turning this to ‘Show Backfaces’. If you cannot see the ‘backside’ of any of the parts of the mesh, leave this on ‘Hide Backfaces’
- PURPLE: We have two options, as previously discussed:
- NOT USING DIFFUSE: this means you are doing all of your colour work through the colourset and texturing the normal. You MUST have a multi for this to work remotely well. For Sims meshes, I recommend using the diffuse, so not this option!
- If you are using this option, leave this on ‘Default’
- USING DIFFUSE: this means we are using our diffuse that we grabbed and edited to be 2048 pixels earlier. Use the dropdown menu to turn this to ‘DiffuseSpecular’
- GREEN: Press this button at the end!
Then hit ‘Save’, and a new material will pop up. Time to populate it!
Populating Materials
The process will be the same for each material, just playing a matching game with the name. As a reminder, multi and specular are the same thing!
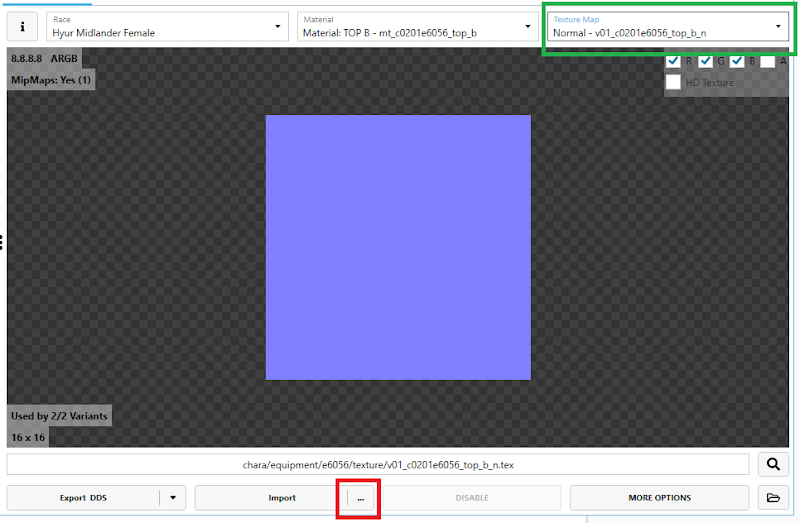
- GREEN: this dropdown menu is how you change between the different parts of a material (normal, multi/specular, diffuse, colourset)
- RED: these three dots are for importing, and will allow you to choose the file you are importing.
Select a part of the material using the dropdown menu (squared in GREEN above). In this example, I will use the normal, but it is exactly the same process for each material.
Once on the part you want to import, press the three dots (the RED squared above), and find the matching material you saved earlier. Select it and import it. There you go! Make sure each imported material is the same type as the one in the green drop down menu (aka: don’t import the diffuse to the normal!). If you mess it up, you can just import it again.
PROBLEM: I want to import a diffuse but I don’t have the option for one in the drop down menu!
During the creation of the material, you forgot to change the material preset settings.
In the bottom bar, press ‘More Options’, then ‘Edit Material’. The same popup as in the Adding Materials Step will pop up. Make sure you change the preset to ‘DiffuseSpecular’ (the PURPLE square in the adding materials step above!).

Colourset
Your colourset will look something like this:
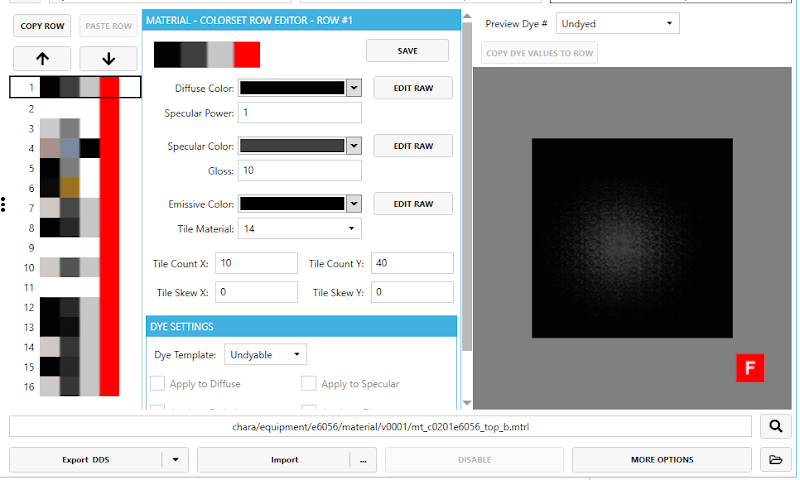
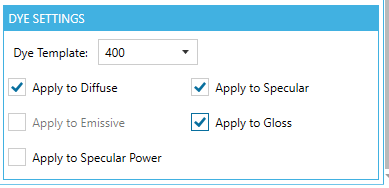
You will likely control your material through either row 1 or row 16. I would recommend putting the diffuse colour to see through (if you have the diffuse enabled), the gloss to 3, and the tile material to zero. These are the settings I have found work best to make Sims meshes dyeable →.
For more in depth discussion of coloursets, GO HERE. Don’t forget to hit the SAVE button!
Importing the Model
We are now going to navigate over to our models tab (just like we were earlier when we grabbed the vanilla fbx to work with! Make sure you’re on the correct race, then press the Import button at the bottom of the screen. A new window will pop up:
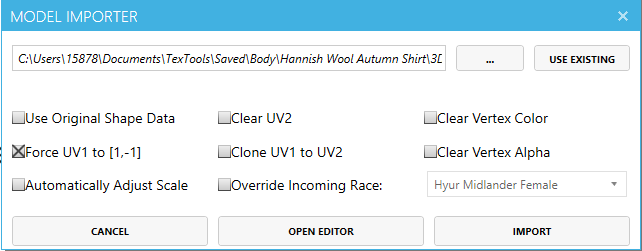
Use the three dots to go and select the FBX that you had previously saved. Once done, press the ‘Open Editor’ button.
PROBLEM: I get a warning that says the mesh does not have a valid skin element?
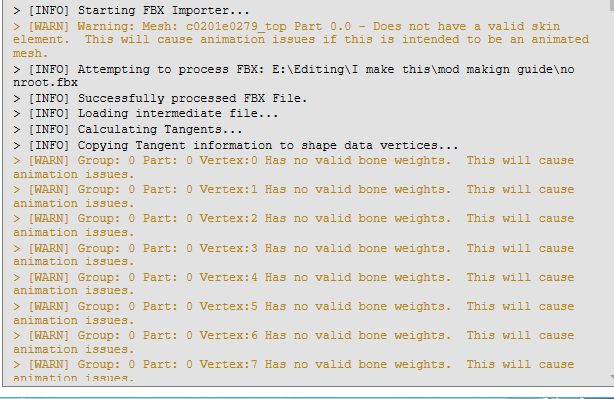
This is because you forgot to add an armature. Go back to the Adding Armatures section and redo!
PROBLEM: I’m getting an error updating viewport!
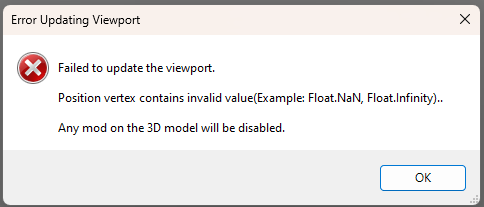
This is because something isn’t weighted properly. Go back to the Weighting section and redo!
Model Editor
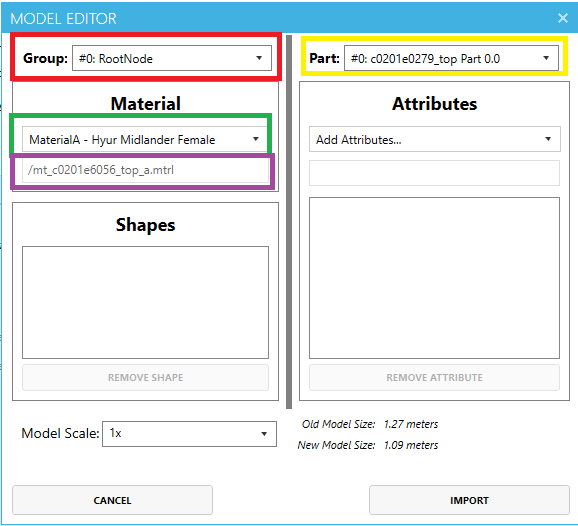
This is what the Model Editor looks like.
Remember, our Part 0 is likely our skin, so we will have to change things around if so.
The RED box is how you switch between parts- So our Part 0.x, Part 1.0, etc.
The YELLOW box is switching between the parts within the group- so Part 0.0, 0.1, 0.2, etc.
The GREEN box is switching materials for the part.
The PURPLE box is where we can edit the exact path.
I’ll walk you through with my example, so you can see everything in action.
Example & Walkthrough
For this example, my sweater is on Bibo+, so I know I have to use the proper skin material for the sections where I have skin. In the GREEN drop down box, I am going to select CUSTOM, then copy/paste the skin material directory.
ATTRIBUTES
I am also going to check the attributes of my skin parts- the attributes tell the game what ‘flags’ to assign to it, so things hide properly using long boots or gloves.
To do this (I cross-reference my Blender file while doing this so I can see what each part is, as I have a poor memory), in your Part 0 (in the RED box, which it shows correctly above), we are going to go through each section in the YELLOW box, and check the attributes. Check the Attribute Listing in the Textools Reference – each part of the body has different ones.
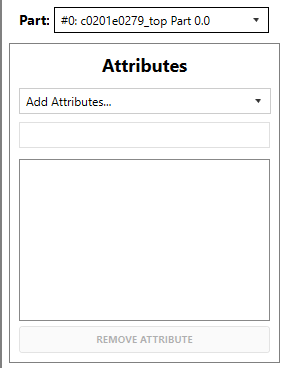
In my case, Part 0.0 is the main body, Part 0.1 is the wrist, and Part 0.2 is the neck. I got rid of the elbows because they cannot be seen!
Part 0.0 looks good, as it has no attribute flags (nor is it supposed to have any).
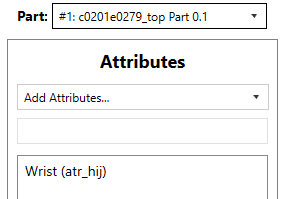
Part 0.1 has the correct attribute listed, as it is the wrist and has the wrist attribute listed.
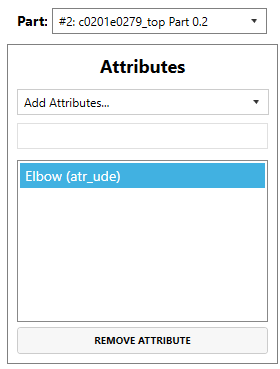
Part 0.2 does NOT have the correct attribute. It is a neck, and has the elbow attribute. I am going to click the incorrect attribute so it highlights blue (as shown), then press ‘remove attribute’. I am then going to click the ‘Add Attributes’ dropdown window and select the CORRECT attribute, in this case the neck attribute.
MATERIAL ASSIGNMENT
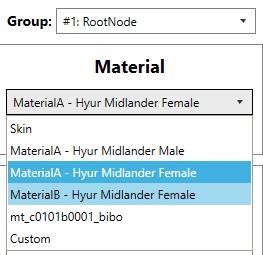
Now we are going back to the RED dropdown and selecting the other part to our mesh- in this case, Part 1. We are assigning it to the material we have created- Material B!
Once all the materials are assigned correctly, press the ‘Import’ button on the lower left. Congratulations, everything is assigned! Your model should show up in the model viewport in Textools.
Create a Modpack
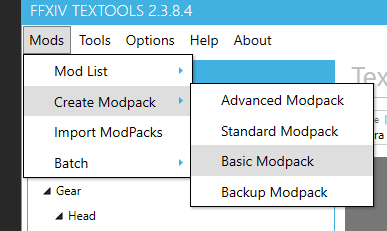
This is the simplest way to do it, as there are many tutorials out there for creating advanced modpacks! Go to the upper lefthand corner and go Mods>Create a Modpack>Basic Modpack.
A new window will pop up.
1. RED: Name modpack whatever you like!
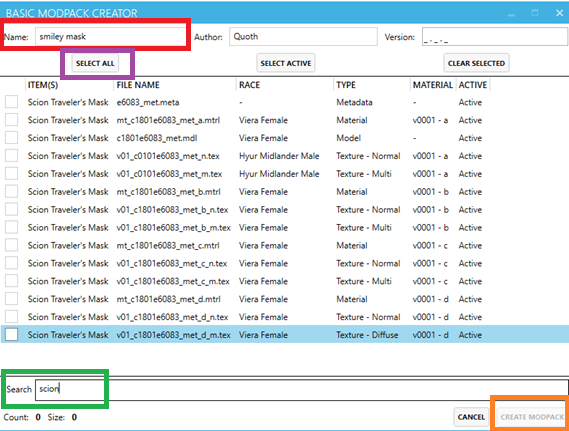
2. GREEN: Type in the search box the name of the vanilla object you are replacing.
3. PURPLE: Use the SELECT ALL button to select everything.
4. ORANGE: Create your modpack!
Finale
Now all that’s to do is go in game, test it out, reweigh it if something breaks, mess with the textures, and have fun!
Thank you all for following this (enormously too long) guide. I tried to put everything in simple terms and include examples. If something isn’t clear, please let me know.
For sake of brevity (LMAO that didn’t work at all) I did not include EVERY possible tripping point, just the most common ones. If you have a new one you do not know how to deal with, feel free to message me or ask in one of the many mod help sections and someone will assist you!
Cheers all,
Quoth ❤